

Dealer guide
How to set up and run your dealership website with the Car Lots theme and plugin.
- Before you start
- Install the theme and plugin
- Run the setup
- Pick your look
- Edit your pages
- Change your info later
- Add and edit vehicles
- Import your inventory feed
- Send your cars to Google, Facebook and more
- Leads, emails and your CRM
- Google Analytics and ad tracking
- Vehicle photos
- Faster photos with Cloud Images (Cloudflare)
- Build your own pages with blocks
- Header and footer menus
- Post a blog
- Background timer (Cloudways cron)
- SEO: how you show in Google
- Redirects and "Pages not found"
- Your own vehicle fields (custom fields)
- Vehicle settings: payments, listings and feed
- Legal pages
- Help and questions
- Coming later
1. Before you start
Have these ready. Setup takes about 10 minutes once you have them.
- Your dealership name, main phone and current website address
- Your logo (PNG or SVG, at least 400px wide) and a white version for dark backgrounds
- Each store's name, address and phone numbers (sales, service, parts)
- Hours for each department you have
- Who should get lead emails, and for which forms
- If you use a CRM: the CRM company name and its lead email address (ADF). Your CRM rep can give you this.
- Optional: your Google Analytics ID (starts with G-), your star rating and up to 3 customer reviews, social media links, team member names and photos
2. Install the theme and plugin
- Sign in to your WordPress dashboard as an administrator.
- Go to Appearance > Themes > Add New > Upload Theme. Choose the Car Lots theme file, then Install and Activate.
- Go to Plugins > Add New > Upload Plugin. Choose the Car Lots plugin file, then Install and Activate.
- The setup opens on its own. If it doesn't, go to Car Lots > Setup.
3. Run the setup
The setup walks you through 9 short steps. Your answers save as you go, so you can leave with Save and exit and come back any time.
Step by step with screenshots: Run the setup.
| Step | What you do |
|---|---|
| 1. Get started | Click Start. |
| 2. Store info | Dealership name, main phone, logo and your store locations. Add more stores with "Add another store". |
| 3. Hours | Turn on the departments you have (Sales, Service, Parts) and set their hours. "Copy Monday to Tue–Fri" saves typing. |
| 4. Leads & CRM | Answer "Do you use a CRM?", then go through each form and pick who gets its leads. See section 10. |
| 5. Service | Yes or No. Pick No and the service sections are hidden on your website. |
| 6. Reviews | Optional. Add as many reviews as you like – your Reviews page shows them all. The homepage and other pages show a short reviews strip with your star rating. Skip it and reviews stay hidden. |
| 7. Analytics | Optional. Your Google Analytics ID. See section 11. |
| 8. Look & style | Pick your header, footer, vehicle card and filter styles, colors and font. See section 4. |
| 9. Review & finish | Check your answers. Anything marked Needs a look can be fixed now or later. Click Finish setup. |
4. Pick your look
In Look & style (setup step 8, or Site settings later):
Step by step with screenshots: Pick your look.
- Styles: choose a Header (A–D), Footer (A–D), Vehicle card (A–E) and Filters (A–C). Click any preview to see it larger.
- Colors: pick one of 9 ready-made color themes in Look & style › Change colors (live preview), then click Customize this theme to change any color. Each theme uses these brand colors:
- Color A: main color for buttons, prices and icons
- Color B: accent and hover
- Color C: dark color for text, top bar and footer
- Color D: light color for backgrounds
- Font: pick one of 8 web fonts. It's used everywhere on your site.
Keep text readable: dark text on light backgrounds, and light text on Color A and Color C.
5. Edit your pages
Car Lots comes with its own drag-and-drop page builder, built right into WordPress. Every page is made of ready-made Car Lots blocks (banner, vehicles, search, reviews, FAQ, contact form and more) that already match your colors, font and layout on phones, tablets and computers.
- Change anything: click any text or photo on the page and type over it.
- Add a block: click + and pick from Car Lots blocks.
- Move or remove: drag a block, or use the up/down arrows. Remove with ⋮ › Delete.
- Vehicles update by themselves: vehicle blocks always show what's in stock right now.
- Pages › Add New, name it "Truck Month".
- Add a Banner: truck photo, headline "Truck Month – this weekend only", button "Shop trucks".
- Add Vehicles: Body style = Truck, 8 cars, title "Trucks on sale".
- Add an FAQ and a Contact form at the bottom.
- Publish, then tick Header menu so it shows in your menu.
Your header, footer, store info and hours aren't edited on the page. They come from Site settings, so you change them once and every page updates. Each text box has a character limit so nothing breaks the layout.
Every block and what you can change: see 14. Build your own pages with blocks.
6. Change your info later
Go to Car Lots > Site settings. It has every setup step, plus:
- Social links: Facebook, Instagram, YouTube, TikTok, X and LinkedIn. Icons show only for links you fill in.
- Team: names, job titles and square photos for your About page.
- Header & footer: turn the top bar, phone, search, contact button, newsletter, social icons and footer hours on or off.
- Photo storage: where vehicle photos are kept. Leave this alone unless your web developer asks you to change it.
Each section shows where that info appears on your site. Click Save changes when you're done.
7. Add and edit vehicles
Most dealers' vehicles come in automatically from an inventory feed. Use Add vehicle to add a car by hand or to add photos and details to a feed car. Only Sales Managers and Administrators can use it, on a phone or a computer.
Step by step with screenshots: Add a vehicle from your phone · Edit your vehicles on a computer.
- Photos: on a phone, tap Take photos and walk around the car, or Choose from photos. On a computer, drag photos in or click Browse for photos. Drag photos to change the order; the first one is the main photo.
- VIN and stock #: type the 17-character VIN and tap Look up. The VIN decoder fills in the year, make, model, trim, body style, engine, drivetrain, fuel type and more. It uses the free decoder from the U.S. government (NHTSA vPIC, National Highway Traffic Safety Administration), so there's nothing to sign up for. It works for vehicles sold in the U.S. from 1981 on; some details (like trim) may be missing, so check them. Add your stock number.
- Details: check what filled in. Boxes outlined in red still need your input, like price and mileage. Type numbers only for price and mileage.
- Features and description: tap every feature the car has and add a short description.
- Tap Publish to put it on your website, or Save draft to finish later (Vehicles > Drafts).
8. Import your inventory feed (Car Lots Feed Importer)
Your cars come in automatically from your inventory provider and update every day. Go to Vehicles › Import feeds › Add feed. Four short steps:
Step by step with screenshots: Import your inventory feed.
- Source: a Feed URL your provider gives you, FTP or SFTP (your provider drops the file on a server), or Upload a file. CSV, Excel (.xlsx), XML and JSON all work. Pick your provider under Feed comes from (vAuto, HomeNet and more) and every column is matched for you.
- Map fields: check the matches. Drag a column from the left onto a field on the right; red boxes are required. Use ‹ › to check a few cars. Auto-match fields does it for you.
- Settings: your choices for missing, sold, no-price and no-photo cars, and when it runs (table below).
- Test run: see what will happen before anything changes, then import.
Built for car feeds – fast
- Fast: made only for vehicle feeds, unlike general-purpose import plugins. Cars are matched by VIN and only cars that changed are updated, so a daily run of about 2,000 cars takes minutes.
- Photos download in the background. Cars go live right away; photos are made in every size behind the scenes. "Photos processing: … left" in the top bar shows progress, and your website keeps working.
- Change your mind any time. Every setting (missing cars, sold, no price, no photos, schedule) can be changed later in Edit › Settings. The new choice applies from the next run.
- Cars no longer in the feed follow your "Cars missing from the feed" choice (table below) – only after they're missing 2 runs in a row.
Auto-match: your columns are matched for you
- Pick your provider under Feed comes from (vAuto, HomeNet, Carzino and more) and every column is matched to the right field in one go.
- Not on the list? Auto-match fields reads your column names (e.g. "Stock Number", "Mileage", "ExteriorColor", "PhotoURLs") and matches them for you.
- The bar at the top shows how many are matched (e.g. "35 of 39 fields matched") and ✓ All required fields set when you're ready.
- Anything wrong? Drag the blue pill to the right field or click × to remove it. Your changes are kept.
Settings (step 3) – your choices
| Setting | Choices |
|---|---|
| Cars missing from the feed | Mark as Sold (recommended): moves to the Sold tab. · Hide: off the website, kept in the admin. · Delete after 30 days: hidden right away, deleted later. · Do nothing. |
| Sold cars stay on the website | Remove right away, or keep them up for a number of days with a "Sold" badge. |
| After a sold car comes off the site | Set in Vehicle settings › Listings: send shoppers to the same model in your inventory, or show a friendly "This car has sold" page with similar cars and a search. |
| Cars with no price | Show "Call for price" (default), or Hide until it has a price. |
| Cars with no photos | Show with "Photos coming soon" (default), or Hide until it has photos. |
| When a car has no photo date | Use the site setting · Use the feed's photos as they are · Treat them as placeholders. See section 12. |
| Run | Run automatically as often as your provider updates: once a day at a time you pick (e.g. 3:00 AM, before the lot opens), or every 1, 2, 3, 4, 6 or 12 hours. Times use your site's time zone (Settings › General) and runs start within 15 minutes of the set time. Need it now? Click Run now on Import feeds any time. Each feed has its own schedule. |
The clean-up sheet: messy feed data fixed for you
Feeds are full of typos and different spellings. Every import runs through the Clean-up sheet, which comes with about 1,700 ready-made rules, so your filters stay short and tidy.
| Feed says | Your website shows |
|---|---|
| CHEVY, chevrolet | Chevrolet |
| F150, f-150 | F-150 |
| 4WD, 4X4, Four Wheel Drive | 4WD |
| Sport Utility, SUV 4D | SUV |
| Ruby Red Metallic | Ruby Red (in the Red color filter) |
- It covers make, model, body style, drivetrain, transmission, fuel, exterior and interior colors, and features.
- Step by step: The clean-up sheet guide.
- Make your own changes in Vehicles › Clean-up sheet: pick a tab (e.g. Model), type what the feed sends and what you want shown, save. Turn off any ready-made rule you don't want.
- Colors keep their real name ("Ruby Red"); the sheet only picks the color filter.
- Hide a feature you don't want shown by saving it as -. Notes wrapped in *** are always removed.
- Changes apply from the next import.
Your edits stick
- Change a price, mileage, trim or any other box on a feed car and your change is kept – the next import won't overwrite it. The box shows ✎ Your edit.
- Want the feed to take over again? Untick it under Your edits in the car's sidebar and click Update. The next import brings the feed value back.
- Photos you add yourself and photos you remove stay that way too.
Built-in protection
- A car goes Sold only after it's missing 2 runs in a row, and if more than 30% of your cars go missing at once nothing changes (a broken feed can't empty your site).
- A car that comes back in the feed is shown again.
- New cars missing year, make or model are saved as drafts for you to check.
After each run
- The result shows right away: new, updated, unchanged, missing.
- Import history under the feed shows the last 30 runs.
- If an import fails, you see a red alert in WordPress and get an email.
9. Send your cars to Google, Facebook and more (Car Lots Feed Export)
Share your inventory with marketing sites. Go to Vehicles › Export feeds, pick a site, and copy the feed address into that site. It updates by itself – no mapping.
Step by step with screenshots: Send your cars to Google, Facebook and more.
- Google Vehicle Ads (needs your Google store code, set in Site settings › Store info)
- Facebook / Meta (Automotive inventory ads)
- CarGurus
- AutoTrader and a Custom CSV for any other site
Every feed uses your best photos (the "share" size), your prices and the automatic description when a car has none. Cars without a price or photos are left out so the sites don't reject your feed.
10. Leads, emails and your CRM
When a shopper sends a form on your website:
Step by step with screenshots: Leads: who gets them and where to find them.
- The people you picked get a lead alert email right away, with the shopper's details and the car.
- If you use a CRM, the lead is also sent to it in ADF, the standard lead format dealer CRMs read.
- The shopper gets a "Thanks, we got your request" email (you can turn this off).
| Form | Lead email | CRM |
|---|---|---|
| Vehicle page form | Yes | Yes (recommended) |
| Car Finder | Yes | Yes, with a placeholder vehicle |
| Financing | Yes | No |
| Contact us | Yes | No |
To change who gets leads, which forms go to your CRM, or the wording on your forms, go to Car Lots > Forms & leads. You can also send leads to another tool like Zapier.
CARFINDER00000000 and stock CAR-FINDER. That's normal; it isn't a real car.First time? Connect your email so these arrive and don't land in spam: follow the Email Setup Guide (about 10 minutes, with screenshots).
Every lead is saved in your dashboard: Car Lots › Leads keeps a copy of every form sent on your website, even if an email fails. Filter by form and date, search by name, email, phone, car or lead ID, click Details to see every answer and where the shopper came from, and Download CSV to open the list in Excel.
What the emails look like
Every form sends up to three emails. The examples below come from a real test on the demo site, with the shopper's details replaced by placeholders.
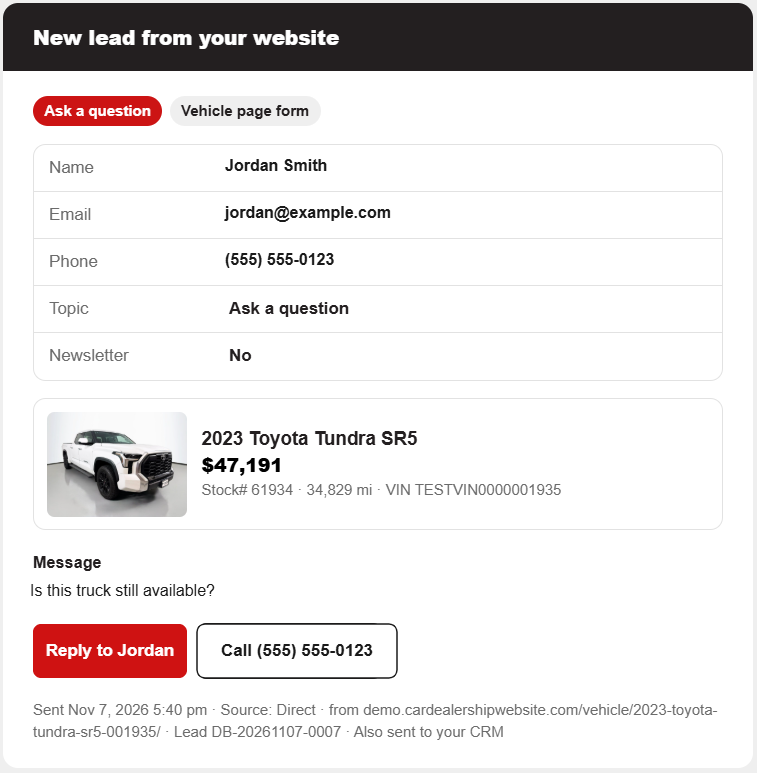
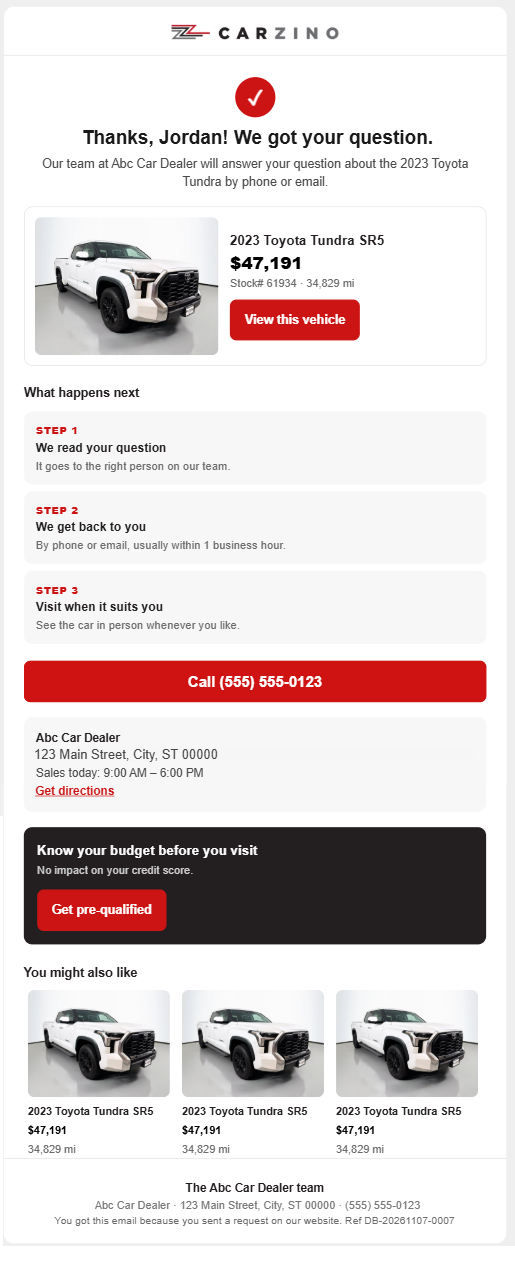
2. ADF email (to your CRM): a plain-text email your CRM reads automatically. Nobody needs to read it. It's sent for Vehicle page, Car Finder and Sell My Car leads when your CRM is turned on. Every shopper answer is in <comments>, followed by the Tracking line (ad source, campaign, Google click ID, pages).
<?xml version="1.0" encoding="UTF-8"?>
<?adf version="1.0"?>
<adf>
 <prospect status="new">
  <id sequence="1" source="dealer_name website">DB-20261107-0007</id>
  <requestdate>2026-11-07T17:40:26+00:00</requestdate>
  <vehicle interest="buy" status="used">
   <year>2023</year><make>Toyota</make><model>Tundra</model><trim>SR5</trim>
   <vin>1HGCM82633A000000</vin><stock>61934</stock><bodystyle>Truck</bodystyle>
   <odometer status="original" units="mi">34829</odometer>
   <price type="asking" currency="USD">47191</price>
  </vehicle>
  <customer>
   <contact>
    <name part="first">Jordan</name><name part="last">Smith</name>
    <email>[email protected]</email><phone type="cellphone">5555550123</phone>
   </contact>
   <comments>Shopper answers: Topic: Ask a question | First name: Jordan | Last name: Smith | Email: [email protected] | Phone: 5555550123 | Message: Is this truck still available? | Newsletter: No
Tracking: lead_id=DB-20261107-0007; utm_source=google; utm_medium=cpc; utm_campaign=fall-sale; gclid=…; ga_client_id=…; landing_page=…; form_page=…</comments>
  </customer>
  <vendor id="dealer-name"><vendorname>dealer_name</vendorname>
   <contact><name part="full">dealer_name</name><phone type="voice">5555550123</phone>
    <address><street line="1">123 Main Street</street><city>City</city><regioncode>ST</regioncode><postalcode>00000</postalcode><country>US</country></address>
   </contact>
  </vendor>
  <provider><name part="full">Car Lots</name><service>Website – Google Ads – Vehicle page form – Ask a question</service><url>https://yourdealer.com/</url></provider>
 </prospect>
</adf>
Change the shopper confirmation
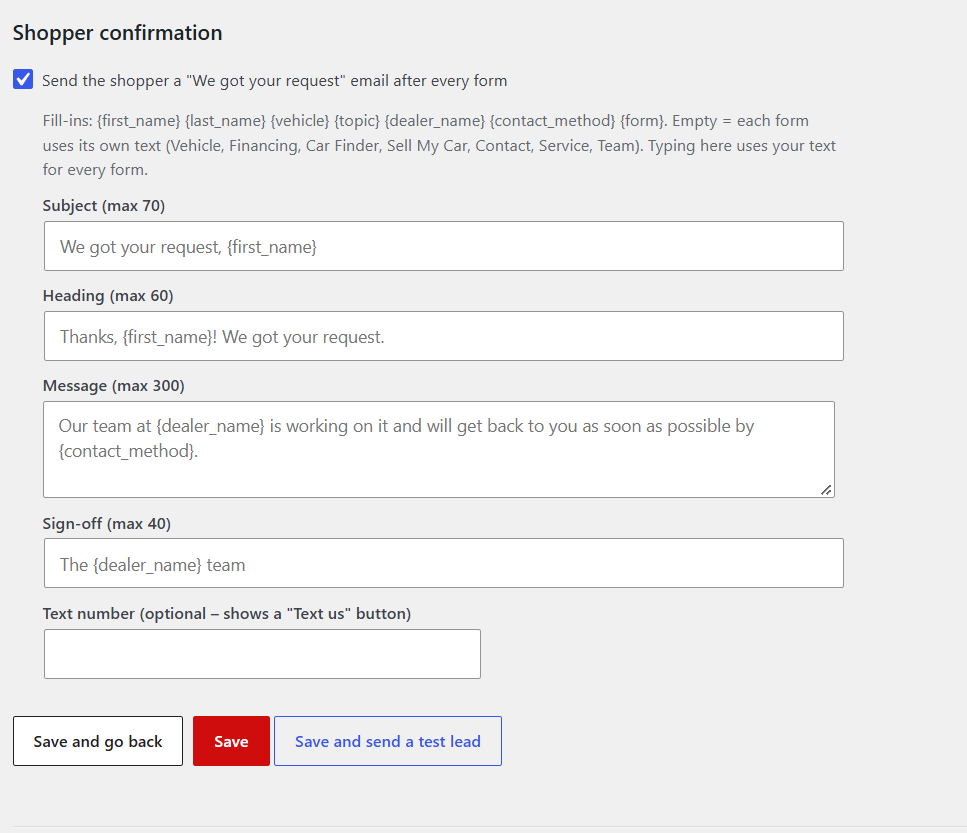
Go to Car Lots › Forms & leads › Shopper confirmation. It's on by default. Untick it to stop sending it. Leave the boxes empty to use each form's own wording (Vehicle, Financing, Car Finder, Sell My Car, Contact, Service, Team), or type your own subject, heading, message and sign-off for every form. Fill-ins like {first_name}, {vehicle} and {dealer_name} are replaced for each shopper. Add a text number to show a "Text us" button. Click Save and send a test lead to see all three emails.
Stop spam leads (Google reCAPTCHA)
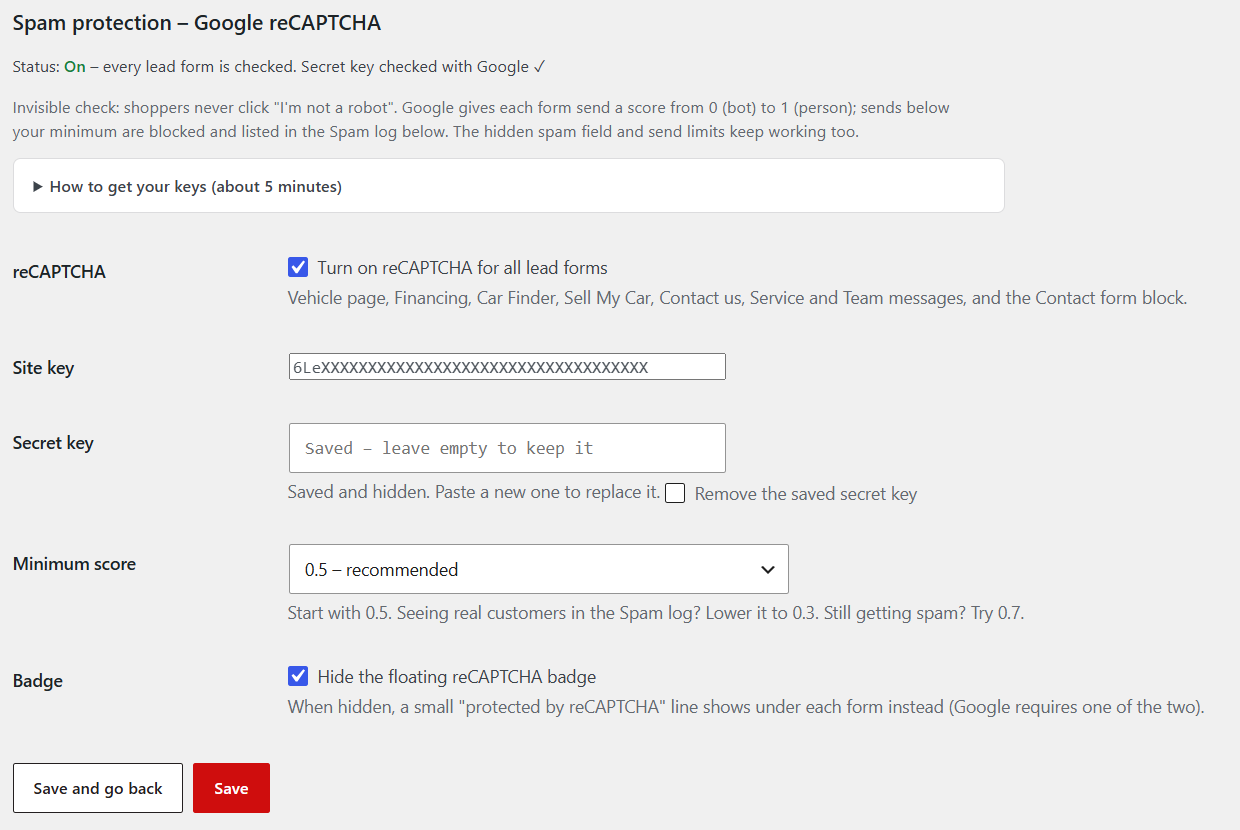
reCAPTCHA is a free, invisible spam check from Google on every lead form. Shoppers never click "I'm not a robot". Google scores each send from 0 (robot) to 1 (person), and sends below your minimum are blocked and listed in the Spam log. If Google can't be reached, the lead still goes through, so real leads are never lost. Google's script only loads when a shopper starts filling in a form, so pages stay fast.
- Go to google.com/recaptcha/admin/create and sign in with your Google account.
- Label: your dealership name, e.g. "dealer_name website".
- reCAPTCHA type: pick Score based (v3), not "Challenge (v2)".
- Domains: add your website address (without https://), plus your test site if you have one. Accept the terms and click Submit.
- Google shows two keys. In WordPress go to Car Lots › Forms & leads and scroll to Spam protection – Google reCAPTCHA. Paste the Site key and the Secret key.
- Tick Turn on reCAPTCHA for all lead forms and click Save reCAPTCHA. The plugin checks the secret key with Google right away and shows On when it works.
- Test it: open your Contact page in a private window and send a message. It should arrive as normal.
- Minimum score: 0.5 is the default. Use 0.3 if real leads are being blocked, or 0.7 if spam still gets through.
- Badge: the floating reCAPTCHA badge is hidden by default. A small "protected by reCAPTCHA" line shows under the forms instead, which Google requires.
- Lost the keys? They are always in your reCAPTCHA admin under Settings.
11. Google Analytics and ad tracking
Add your Google Analytics ID (starts with G-) in setup step 7 or Site settings. Find it in Google Analytics under Admin > Data streams > your website. Your website then tracks these for you:
- Phone number taps (
click_to_call) - Vehicle page form sent (
product_submission) - Financing form sent (
form_submission, credit_app) - Car Finder form sent (
form_submission, car_finder) - Contact us form sent (
form_submission, contact)
In Google Analytics, mark the form events as key events (conversions). Every lead also gets a lead ID that matches the one in your CRM, so you can see which leads became sales.
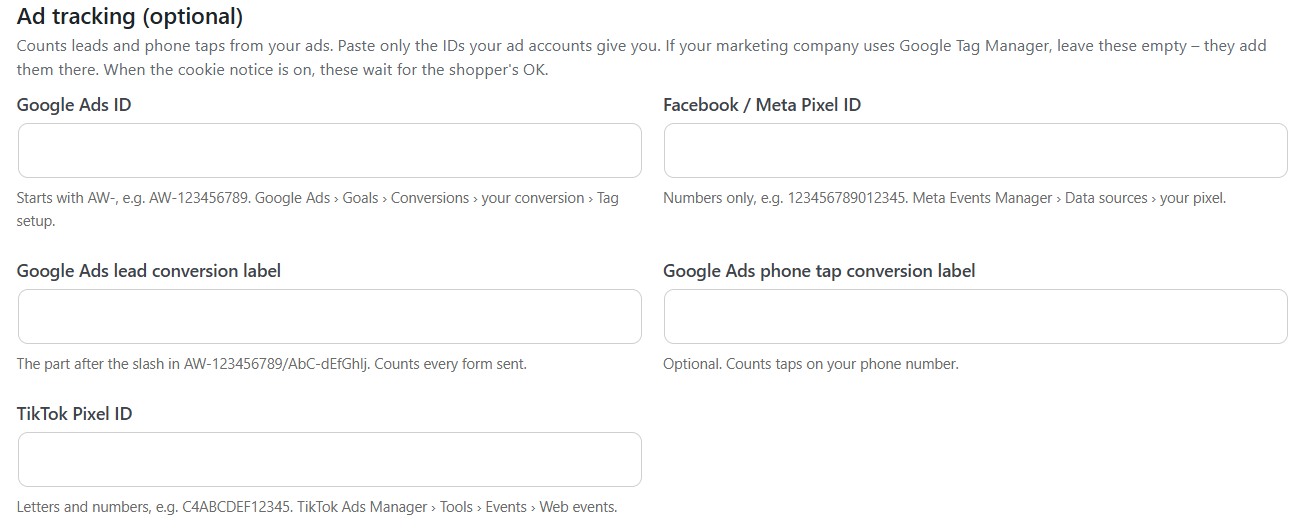
Advertising? Paste your Google Ads, Meta (Facebook) Pixel, Microsoft (Bing) Ads and TikTok IDs in the same place, plus an Other tracking code box for anything else (Snapchat, CallRail, chat). Calls and leads are then counted in each ad account. (Coming in the next update.)
Step by step with screenshots: Track visits, calls and leads.
Google Ads, Facebook (Meta) and TikTok
Go to Car Lots › Site settings › Store info › Ad tracking and paste the IDs from your ad accounts. Leave a box empty if you don't use it.
- Google Ads ID (AW-123456789) and the lead conversion label (the part after the slash, e.g. AbC-dEfGhIj): every form sent counts as a conversion. Add a phone tap label to count calls too. Find both in Google Ads › Goals › Conversions › your conversion › Tag setup › Install the tag yourself.
- Facebook / Meta Pixel ID (numbers only): Meta Events Manager › Data sources. Forms count as Lead, phone taps as Contact.
- TikTok Pixel ID: TikTok Ads Manager › Tools › Events › Web events. Forms count as SubmitForm, phone taps as Contact.
- If your marketing company uses Google Tag Manager, give them your GTM ID and leave these empty, so nothing counts twice.
- With the cookie notice on, these only load after the shopper clicks to allow ad cookies.
Cookie notice and "Your Privacy Choices"
Your site has its own cookie notice built in. No extra plugin is needed.
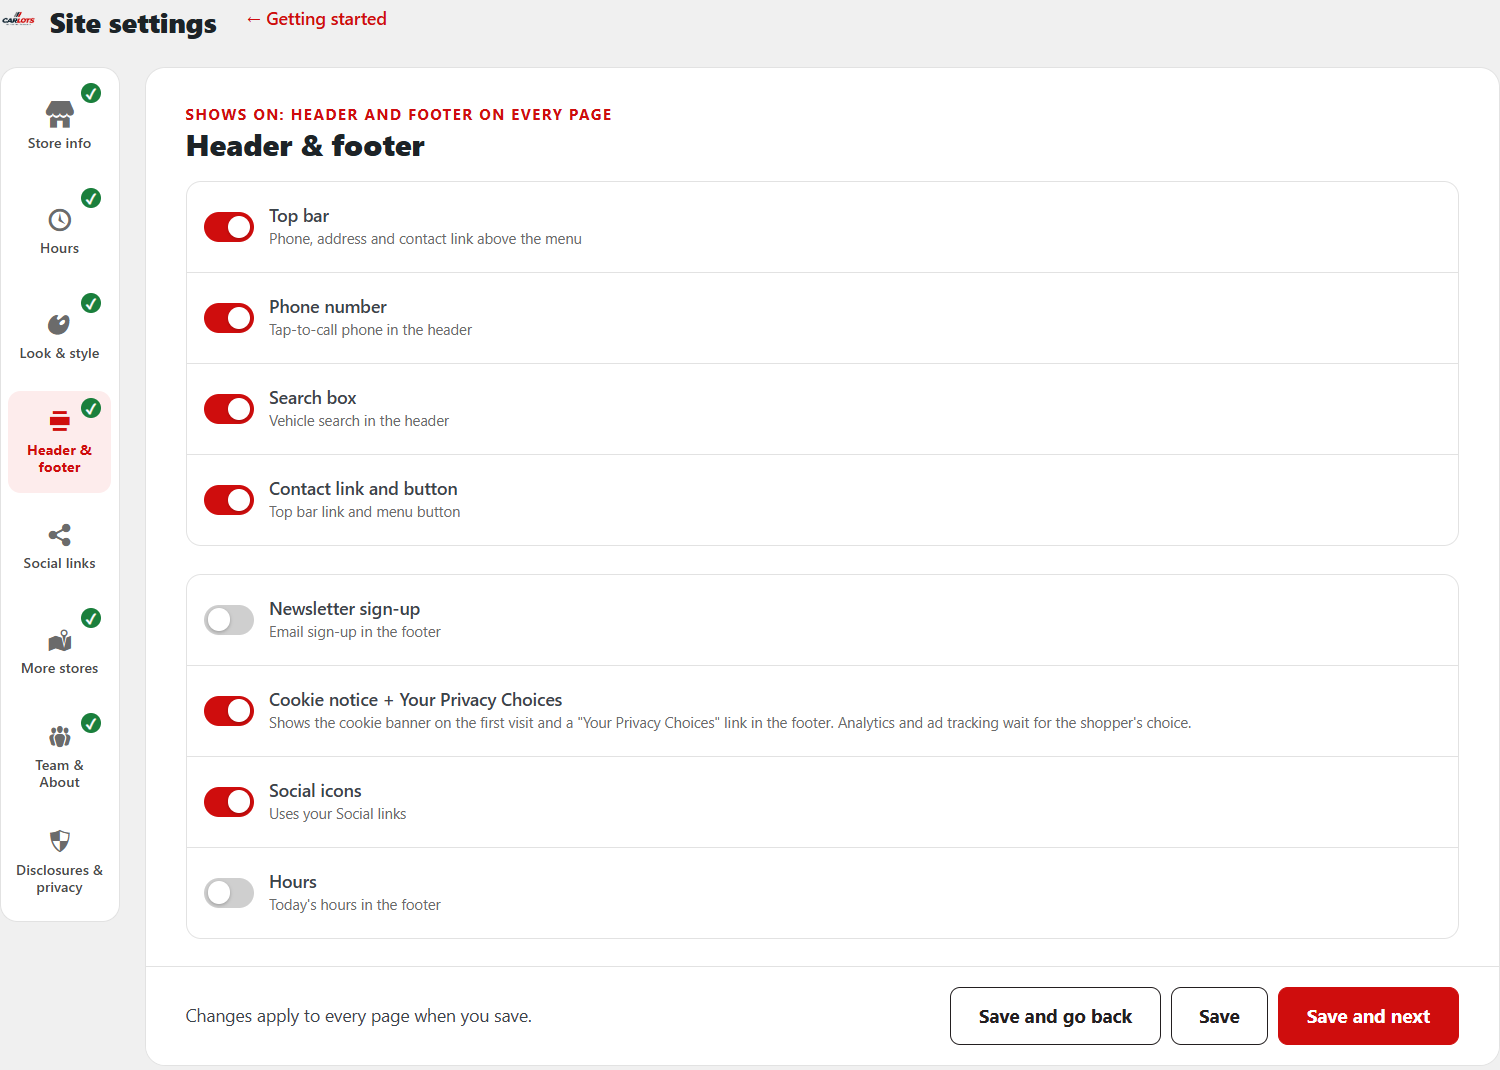
- What shoppers see: on their first visit, a small banner at the bottom with Choose, Reject and Accept. A Your Privacy Choices link in the footer opens the same choices anytime.
- The choices: Necessary (always on: favorites, compare, forms), Analytics (Google Analytics) and Advertising (Google Ads, Meta, TikTok, Microsoft). The choice is saved for 12 months.
- What it does: Google Analytics and ad tracking wait until the shopper allows them. If the shopper's browser sends a "do not share" signal (Global Privacy Control), Advertising stays off.
Turn it on or off:
- Go to Car Lots › Site settings › Header & footer.
- Find Cookie notice + Your Privacy Choices and turn the switch on (red) or off (gray).
- Click Save.
Change the banner text:
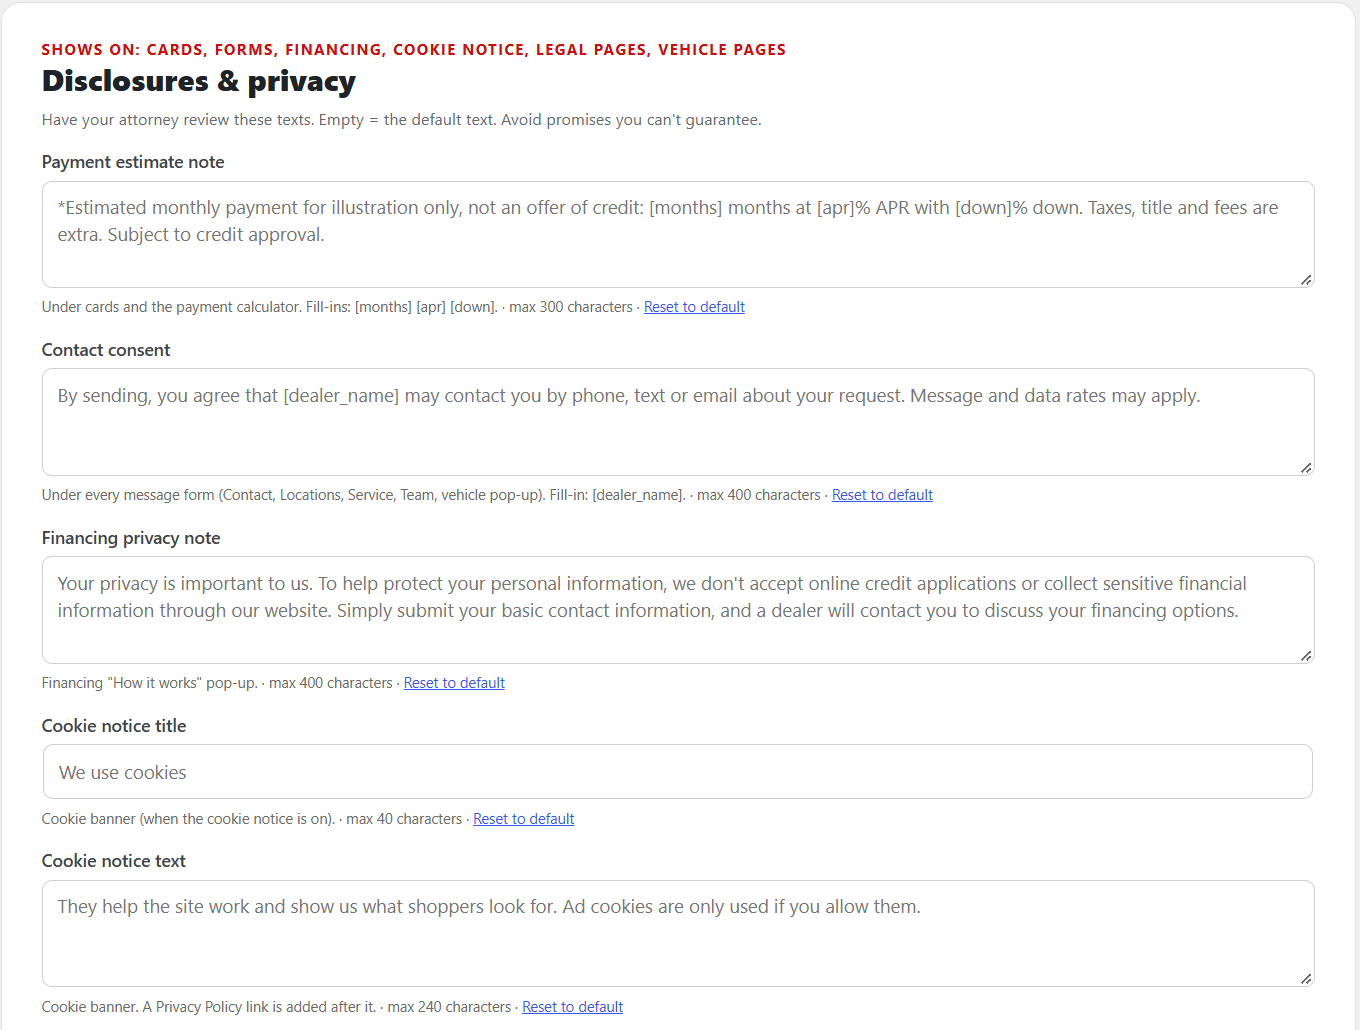
- Go to Car Lots › Site settings › Disclosures & privacy.
- Edit Cookie notice title (up to 40 characters) and Cookie notice text (up to 240; a Privacy Policy link is added after it). Leave a box empty to use the default ("We use cookies" …).
- Click Save.
We suggest leaving it on. If you turn it off, tracking loads for every visitor without asking. Check with your attorney what your state requires.
12. Vehicle photos
Vehicle photos come from your feed (or you add them on the car). They are kept separate from the Media Library so thousands of car photos don't clutter it.
Where to change photo settings
- Vehicles › Vehicle settings › Listings: replace photos when the feed's photo date is newer, what to do with "coming soon" pictures, and how many days to wait before removing photos of deleted cars (7).
- Vehicles › Import feeds › your feed › Settings: the same choices for one feed only.
Reshoots (photo date)
- If your feed has a "date photos taken" column, it's matched automatically (e.g. PhotosLastModified, Photo Date).
- When that date gets newer, the car's photos download again and replace the old ones. The old photos stay up until the new ones are ready.
"Image coming soon" pictures
- Placeholders (default): stock "coming soon" pictures aren't downloaded; the car shows "Photos coming soon" until real photos arrive.
- Use as they are: whatever the feed sends is downloaded.
- Always skip a known picture: add part of its address under Placeholder photo addresses (e.g.
coming-soon).
Removing photos and cars
- Remove photo on a car deletes it. A removed feed photo stays removed unless the feed sends a newer one. Photos you added yourself are never changed by the feed.
- Moved to Trash: photos stay, so a restored car keeps them.
- Deleted for good: photos are removed after 7 days (your setting). Need it now? Delete permanently + photos now in the Trash.
Where photos are stored
- Standard: on your own website. Nothing to set up.
- Cloud Images (Pro): on your own Cloudflare account, faster and usually $0/month. See section 13.
13. Faster photos with Cloud Images (Cloudflare)
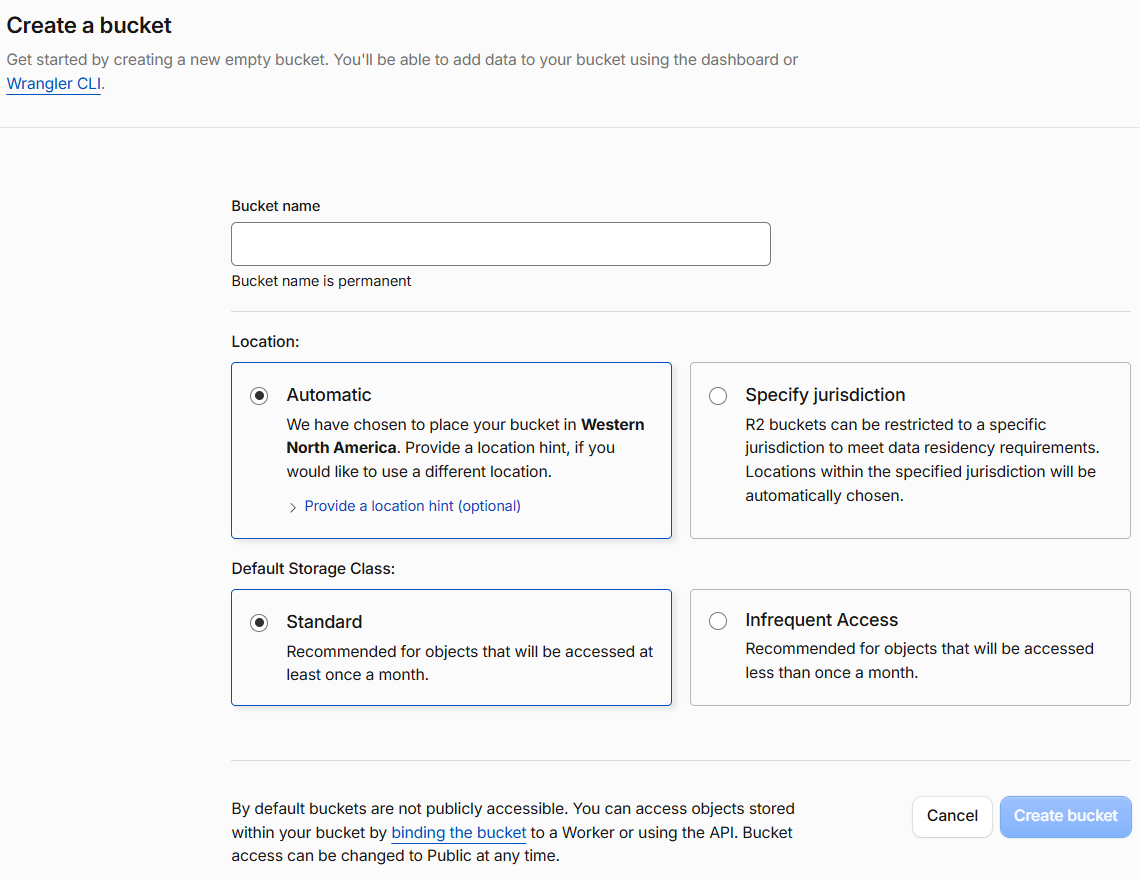
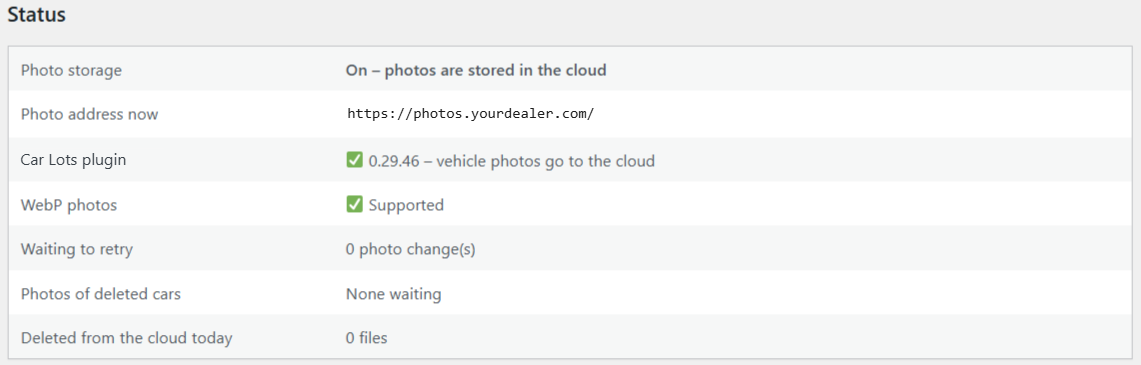
Pro plan. The Car Lots Cloud Images plugin moves your vehicle photos to your own Cloudflare account (R2 storage). Photos load faster, your server stays small, and it usually costs $0 a month. Setup takes 30–45 minutes, once.
- Cloudflare › R2 › Create bucket: name it, e.g.
car-lot-photos. - Bucket › Settings › Custom Domains: add a photo address on your own domain, e.g.
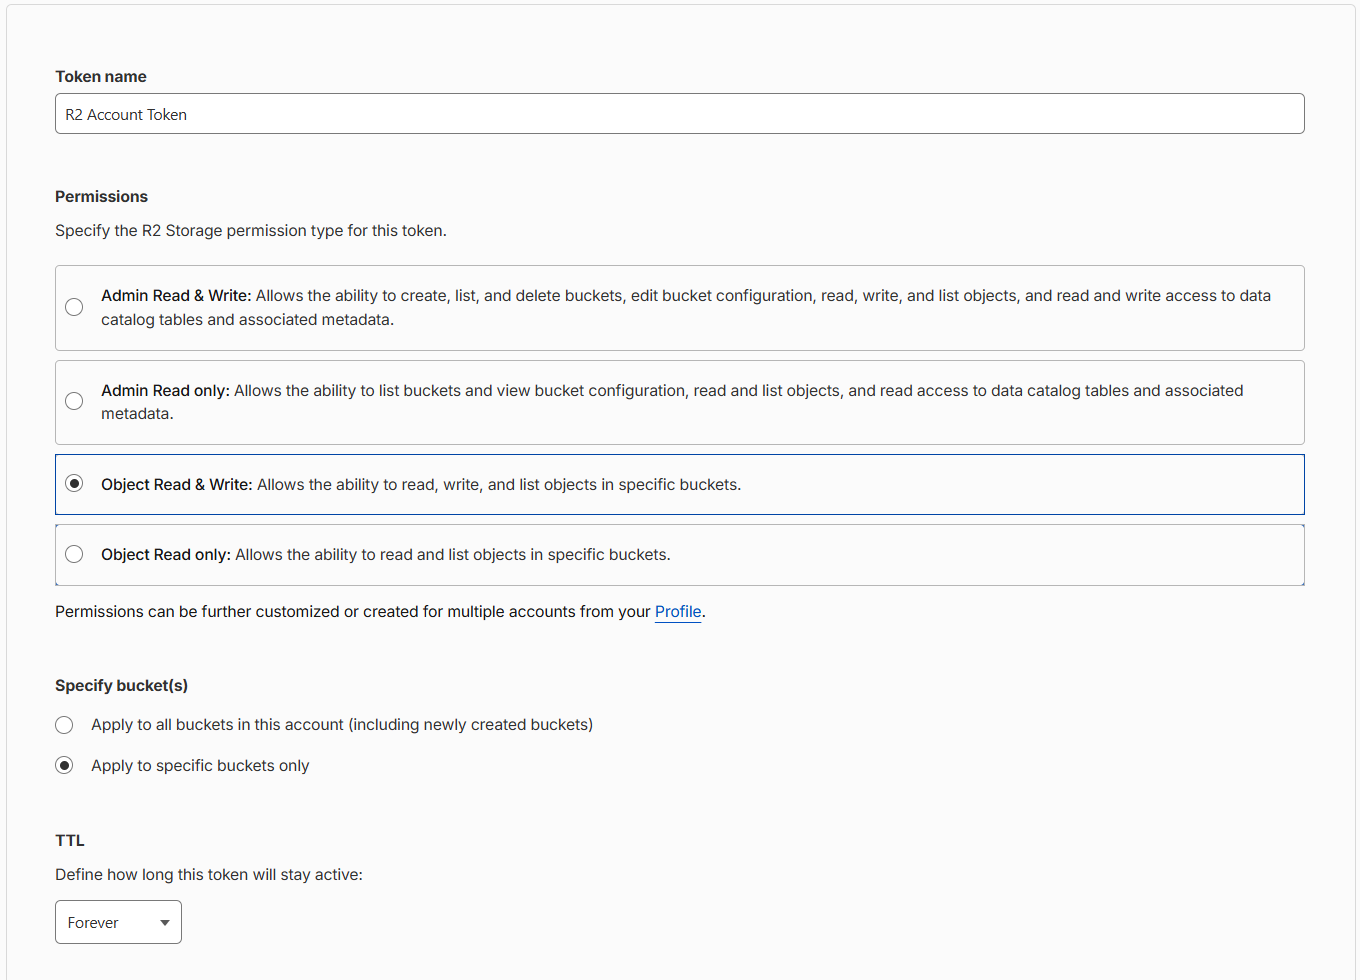
photos.yourdealer.com. Wait until it says Active. - R2 › Manage API tokens › Create Account API token: Object Read & Write, Apply to specific buckets only, pick your bucket. Copy the Access Key ID and Secret.
- Car Lots › Cloud Images: paste the account ID, bucket, keys and photo address, then Save & Test.
- Click Move existing photos to cloud. It runs in the background (keep the background timer on – section 17) and shows how far it is.


14. Build your own pages with blocks
For extra pages like Specials, Careers or Trucks for sale.
Step by step with screenshots: Build a page and pick which cars show.
Start a page
- Pages › Add New and type the page name (e.g. "Specials"). It becomes the address
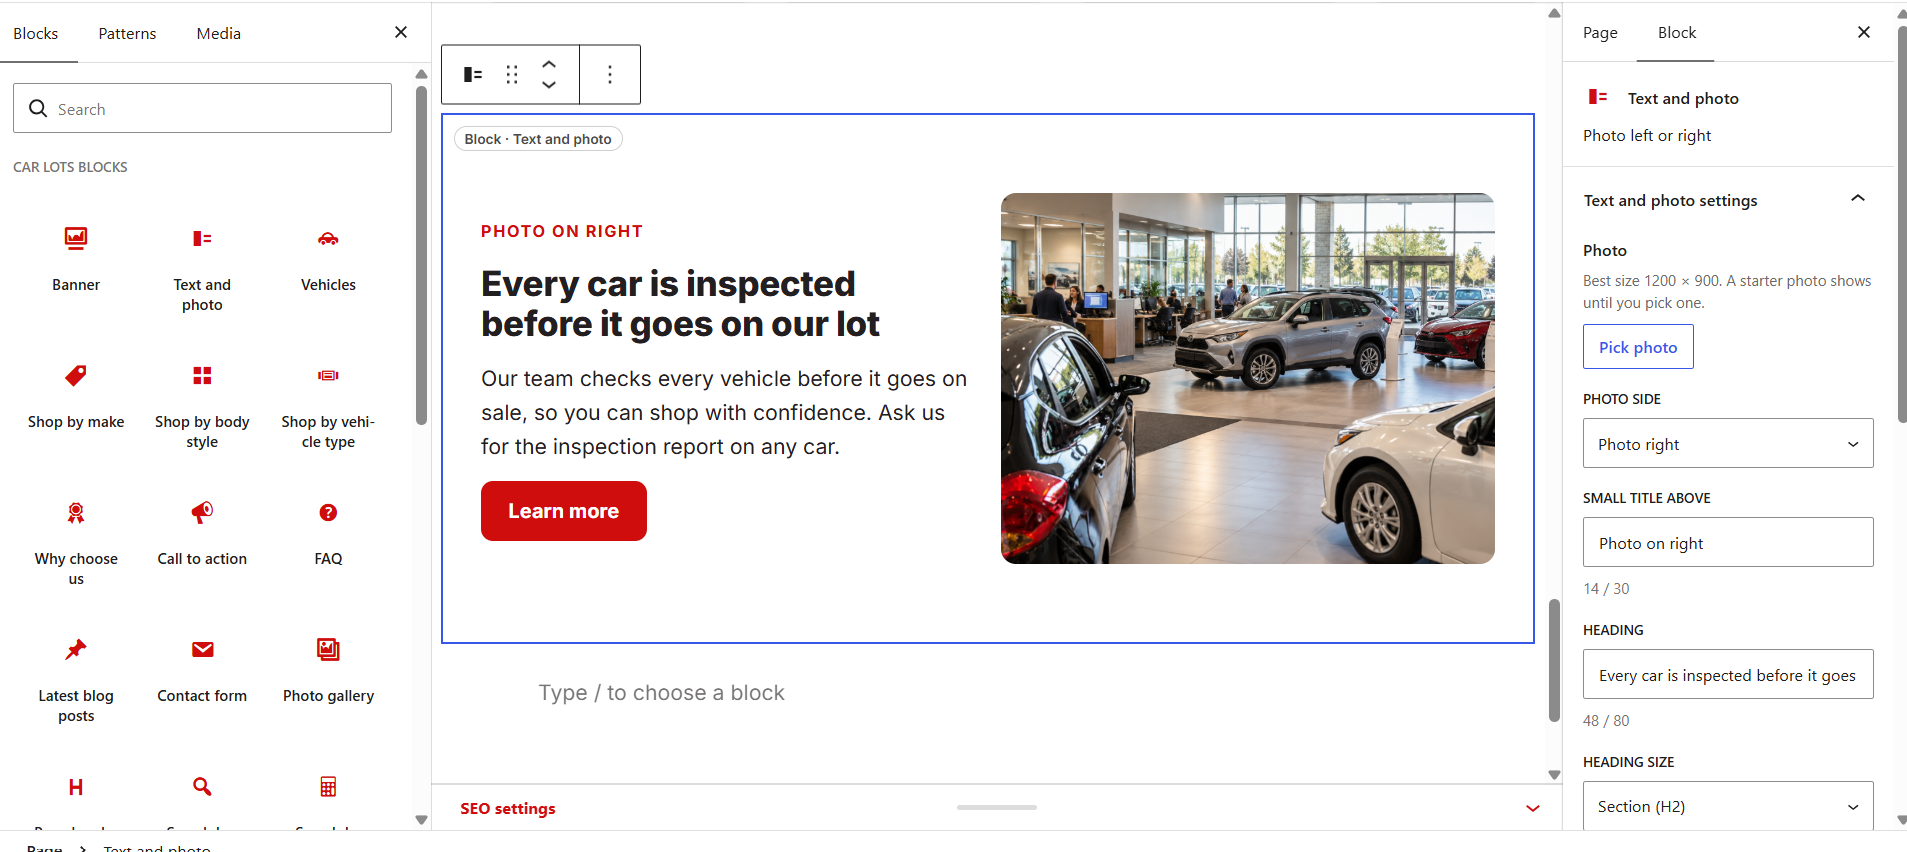
/specials/. - Click + (top left). Your blocks are under CAR LOTS BLOCKS. Hover to preview, click to add.
- Click a block to change it in the right panel. Move it with the up/down arrows; remove with ⋮ › Delete.
- Publish, then View page.
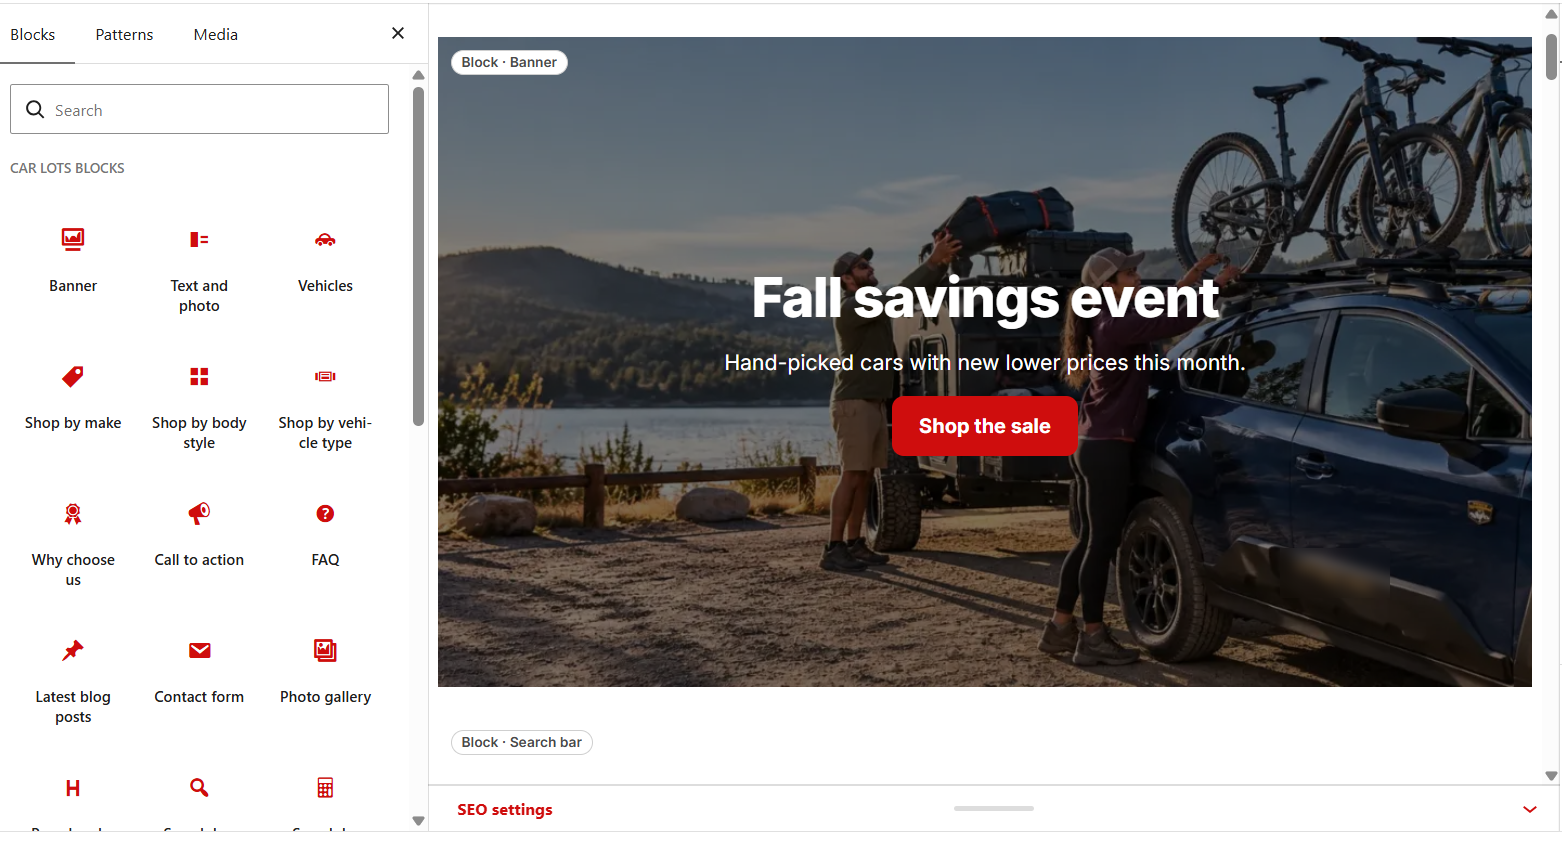
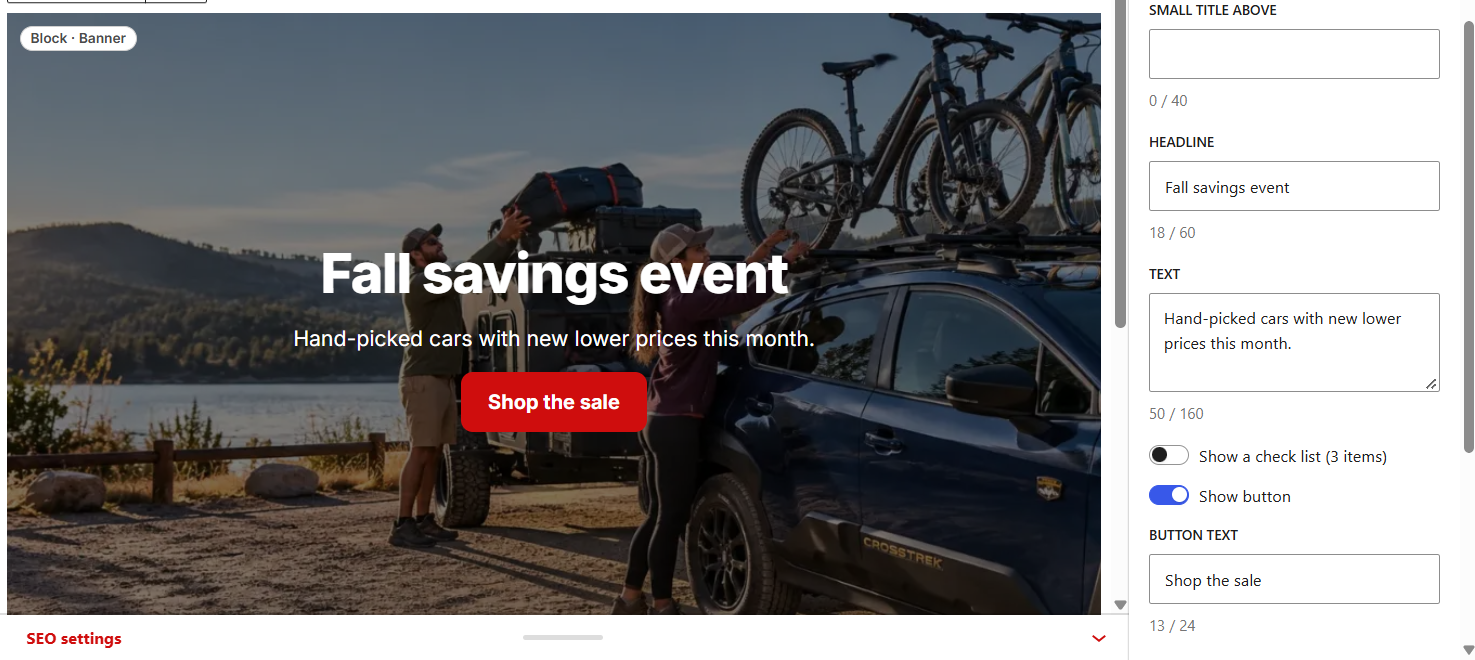
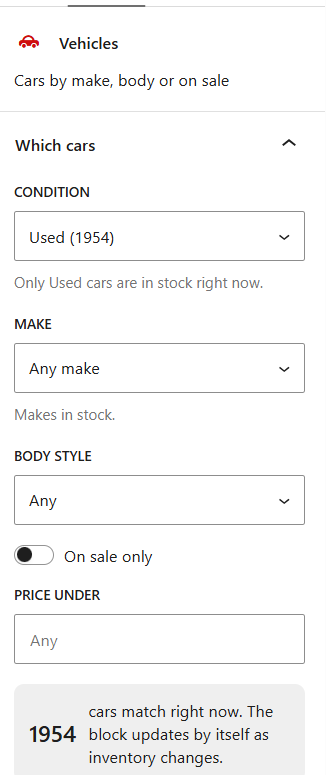
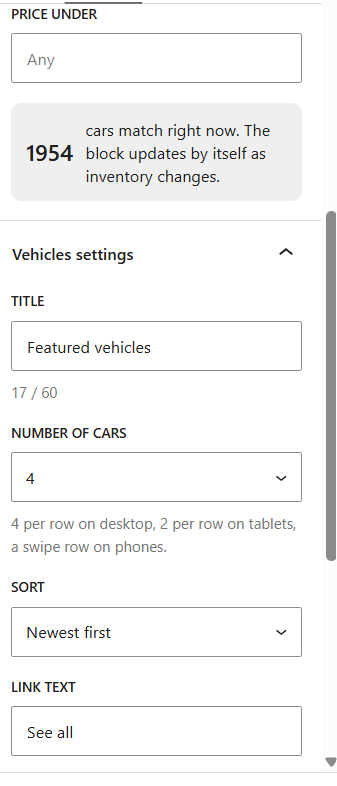
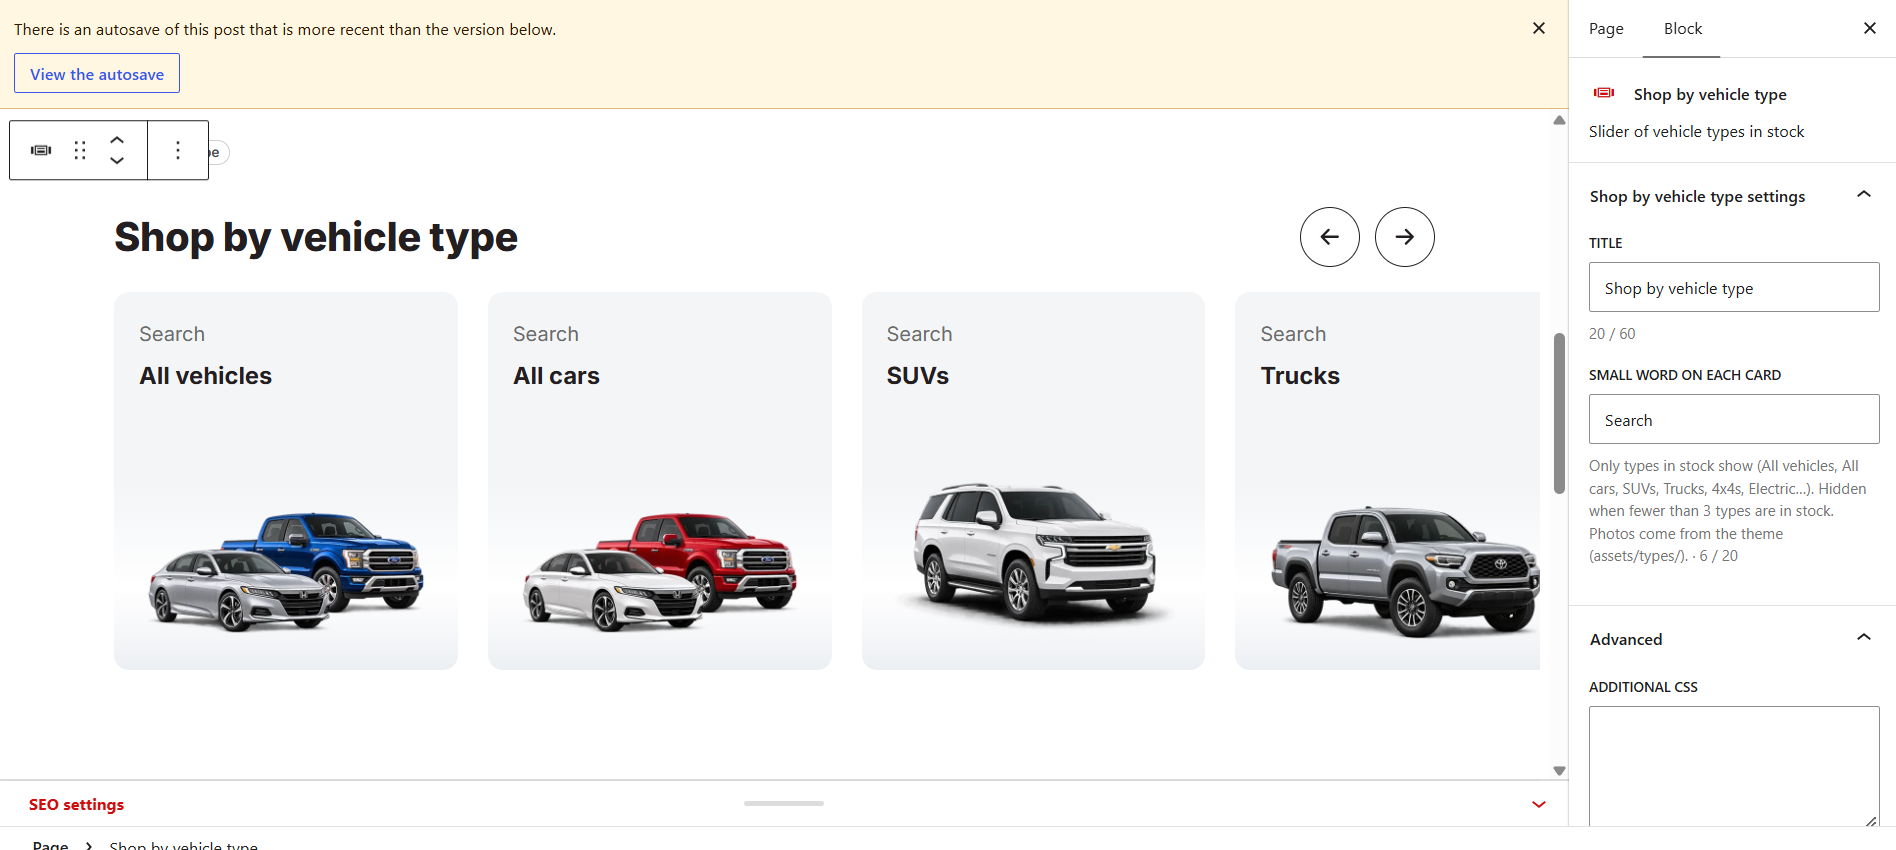
Click any block on the page and its settings open on the right. Change the text, the photo and which cars show. The page updates while you type.
The blocks
| Block | Use it for |
|---|---|
| Banner | Big photo with a headline and 1–2 buttons |
| Text and photo | Photo on one side, text on the other |
| Page header | Simple title and intro, no photo |
| Vehicles | A row of your cars. You pick which: condition, make → model → trim, body style, on sale only, price under, how many (4–16) and the sort. Shows "N cars match right now". How to pick the cars › |
| Shop by type / make / body style | Tiles that link into your inventory |
| Popular searches · Search bar · Search by payment | Ways for shoppers to start a search |
| Why choose us | 3 reasons with icons |
| Call to action | Colored strip with one button |
| FAQ | Up to 10 questions (also shows in Google) |
| Latest blog posts | Your 3 newest posts |
| Contact form · Store info and hours | Message form, address, hours, map |
| Photo gallery | Up to 12 photos, opens full screen |
Text boxes show a counter (e.g. "24 / 60") so you know the limit.
Good to know
- Only what's in stock shows. A Vehicles block with 0 matching cars hides itself and comes back when cars arrive.
- Buttons: link to a page like
/finance/. Empty second button = calls your sales phone; type{phone}to show the number. - Photos: Banner 1920 × 1080, Text and photo 1200 × 900, Gallery 1600 × 1200. JPG or WebP, under 300 KB. Always add Alt text.
- Menu link: right panel › Page › Show a link to this page › tick Header menu or a footer column.
- SEO: the SEO box under the page fills itself in on save. Change it any time.
- Contact form leads go to your "Contact" recipients, not to your CRM.
- Change not showing? Click Update, clear your site cache, refresh.
15. Header and footer menus
- Appearance › Menus. Make a menu, add pages or links.
- Tick Main menu for the header, or Footer column 1–4 for the footer. Save.
- Top items show in the header row. Items dragged under another item become its drop-down.
- On phones and tablets every link shows in the slide-out menu.
- Favorites and Compare are header icons, so you don't need menu links for them.
- No menu set? A ready-made one is used (Shop + Menu with Trade In, Financing, Service, About and more).
16. Post a blog
Start
- Posts › Add New. The post opens with a ready layout: type over the gray text, delete blocks you don't need.
- Reusing an older post? Posts › All Posts, hover it, click Duplicate.
Write
- The title is the big heading. Use H2 for sections, H3 for smaller parts.
- Fonts and colors follow your site style. Text pasted from Word or Google Docs is cleaned when you save.
Photos
- Featured image (right panel): 1600 × 900. Shows on the blog list and at the top of the post.
- Photos in the post: 1600 px wide. JPG or WebP, under 300 KB. Always add Alt text.
Finish
- Pick a Category (News, Buying tips, Financing, Trade-in, Sell your car, Service and parts, Maintenance). No pick = News.
- Optional: Button at the end of the post, e.g. "Get pre-approved" ›
/finance/. - Publish, or click the date next to Publish to schedule it.
Comments are off to stop spam. To turn on: Settings › Discussion, then open them on each post.
Step by step with screenshots: Change your header and footer links.
17. Background timer (Cloudways cron)
Car Lots does work in the background: making photo sizes, scheduled feed imports, sold-car clean-up and emails. WordPress only runs it when someone visits, so on a quiet site it can fall behind. A cron job runs it every minute. Set it up once per website (5 minutes).
You need it if
- "Photos processing: … left" in the black top bar goes down very slowly.
- Scheduled imports run late.
Set it up
- Cloudways › your application › Cron Job Management › Add New Cron Job.
- Type: PHP. Command:
wp-cron.php. Run: Every minute. Save.
Check it works
- After 5 minutes the "Photos processing" number drops every minute.
- Car Lots › Status › Background jobs shows Photo processing (every minute) with a "Next" time a minute away.
18. SEO: how you show in Google
Car Lots has its own SEO built in – no SEO plugin needed. Titles, descriptions, share images and Google's car details (structured data) are written for every page and car automatically.
Step by step with screenshots: SEO and redirects.
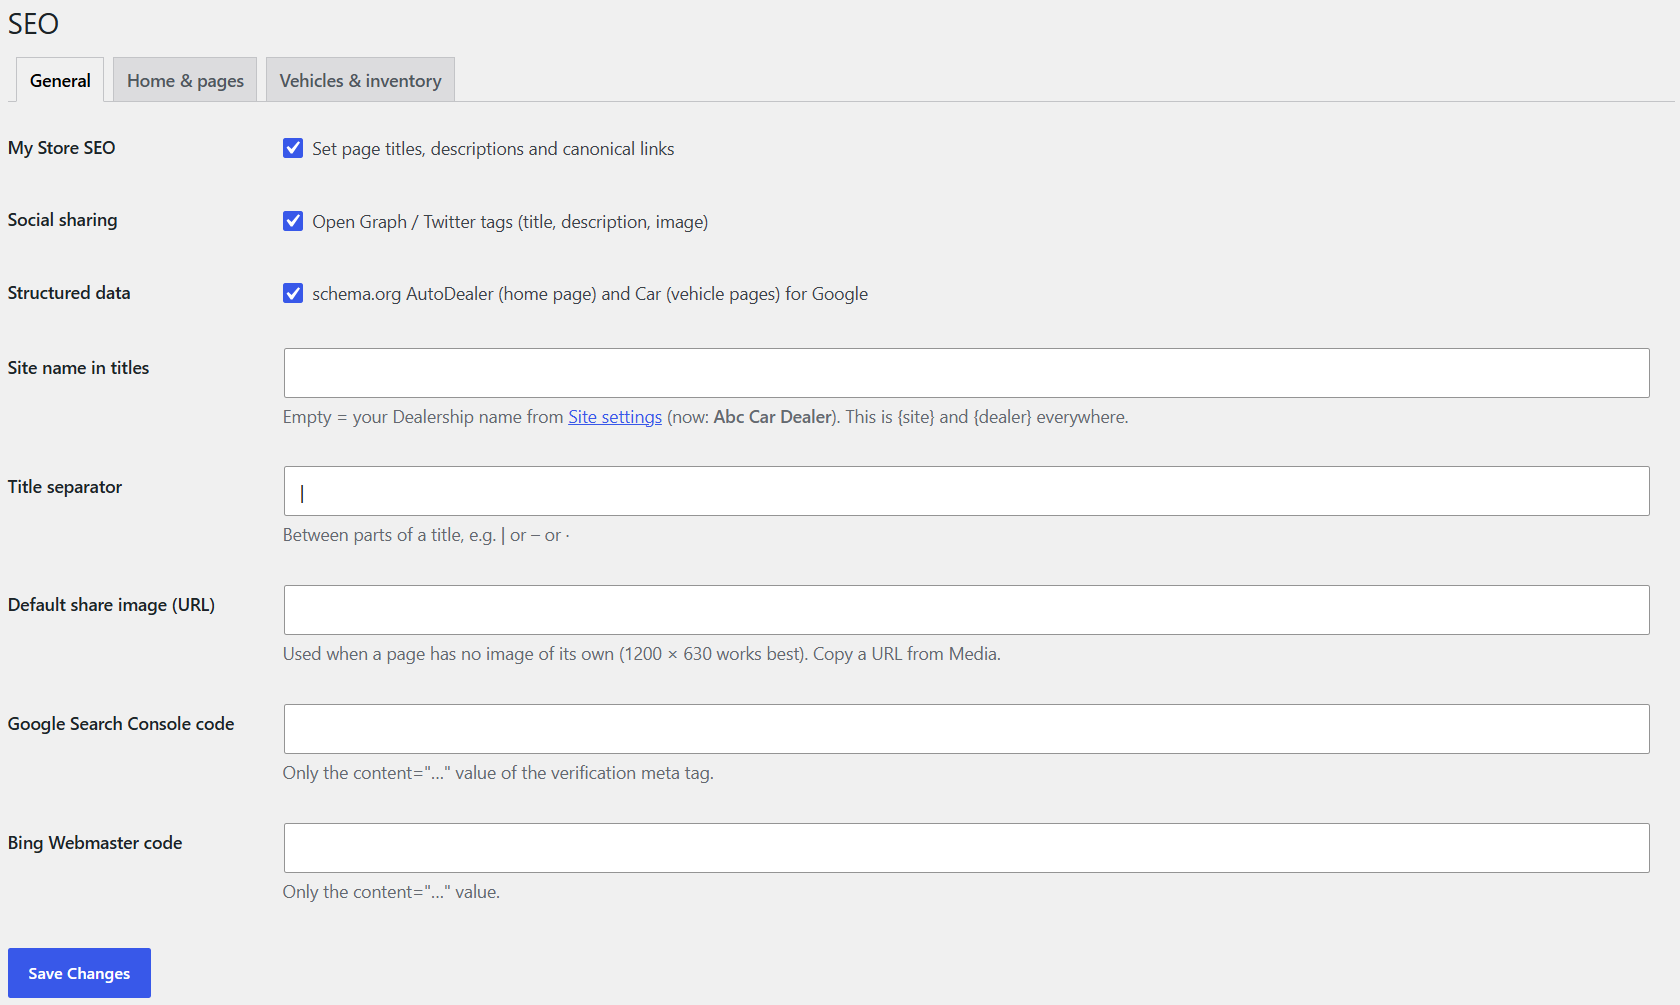
- Car Lots › SEO › General: site name, title separator, default share image, Google Search Console and Bing codes.
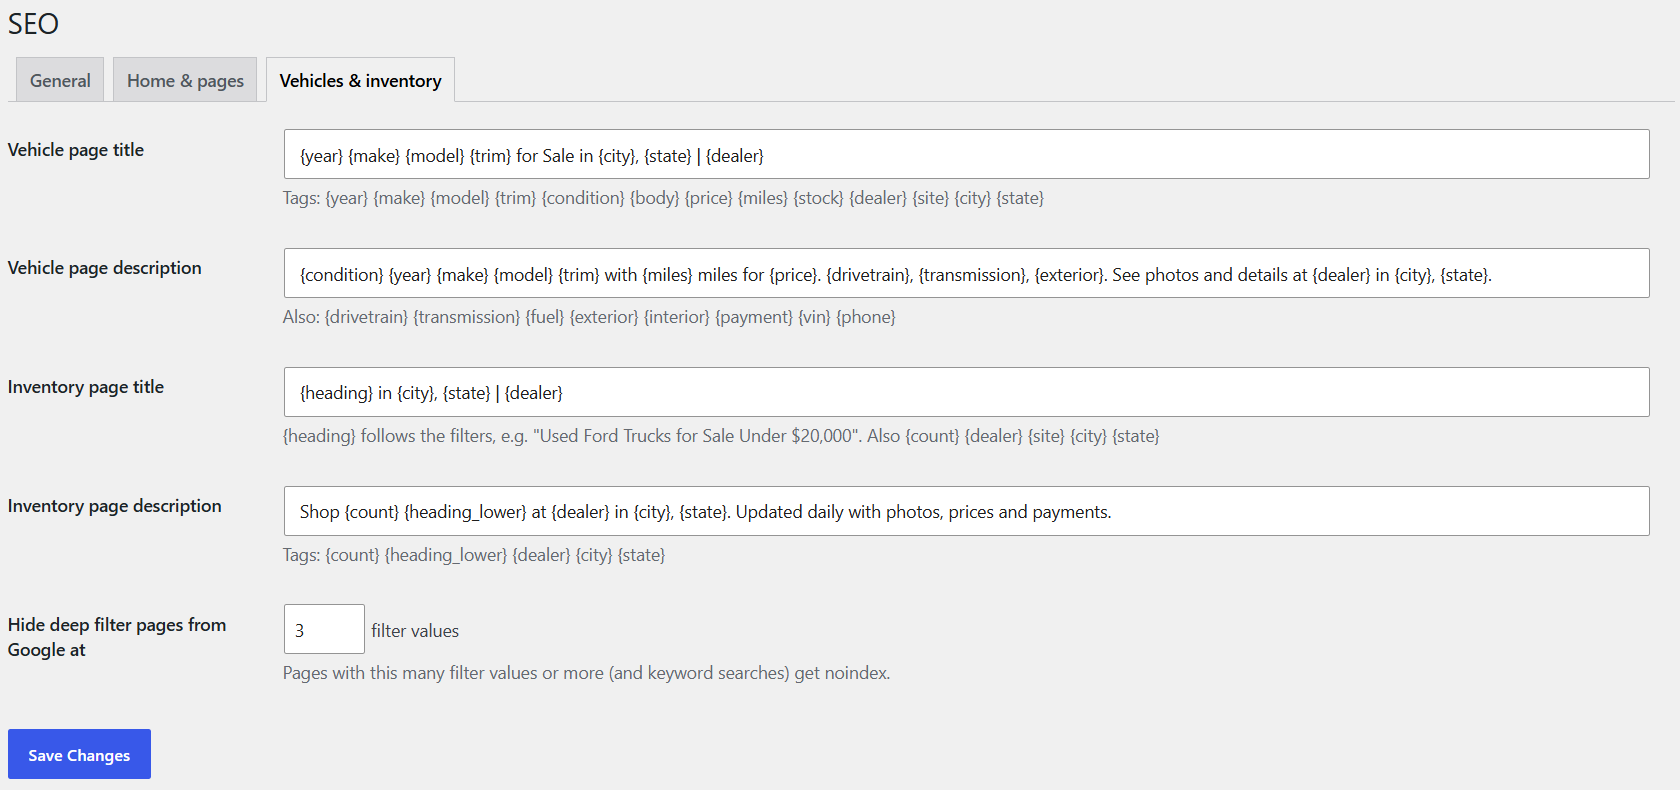
- SEO › Pages / Vehicles: the title and description patterns, with tags like {year} {make} {model} {city} {dealer}. Inventory titles follow the filters ("Used Ford Trucks for Sale Under $20,000").
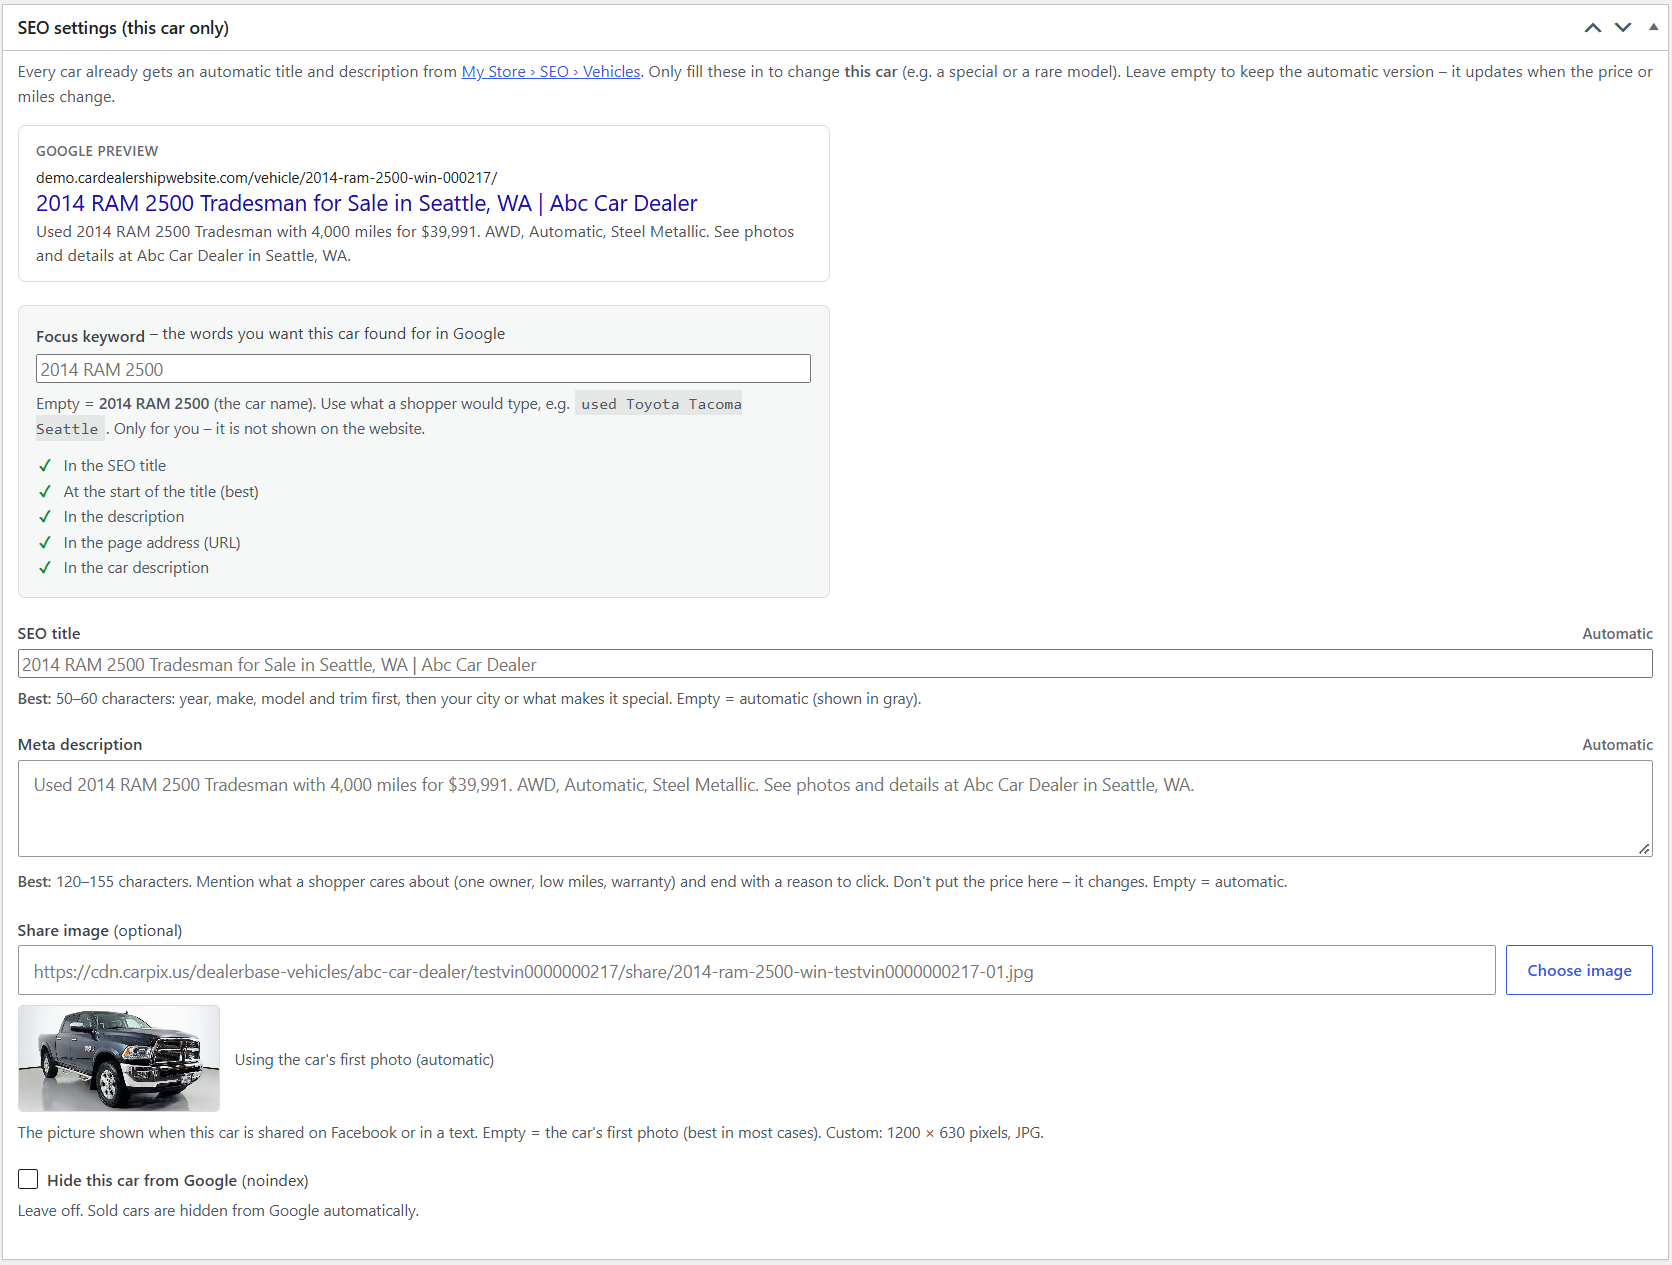
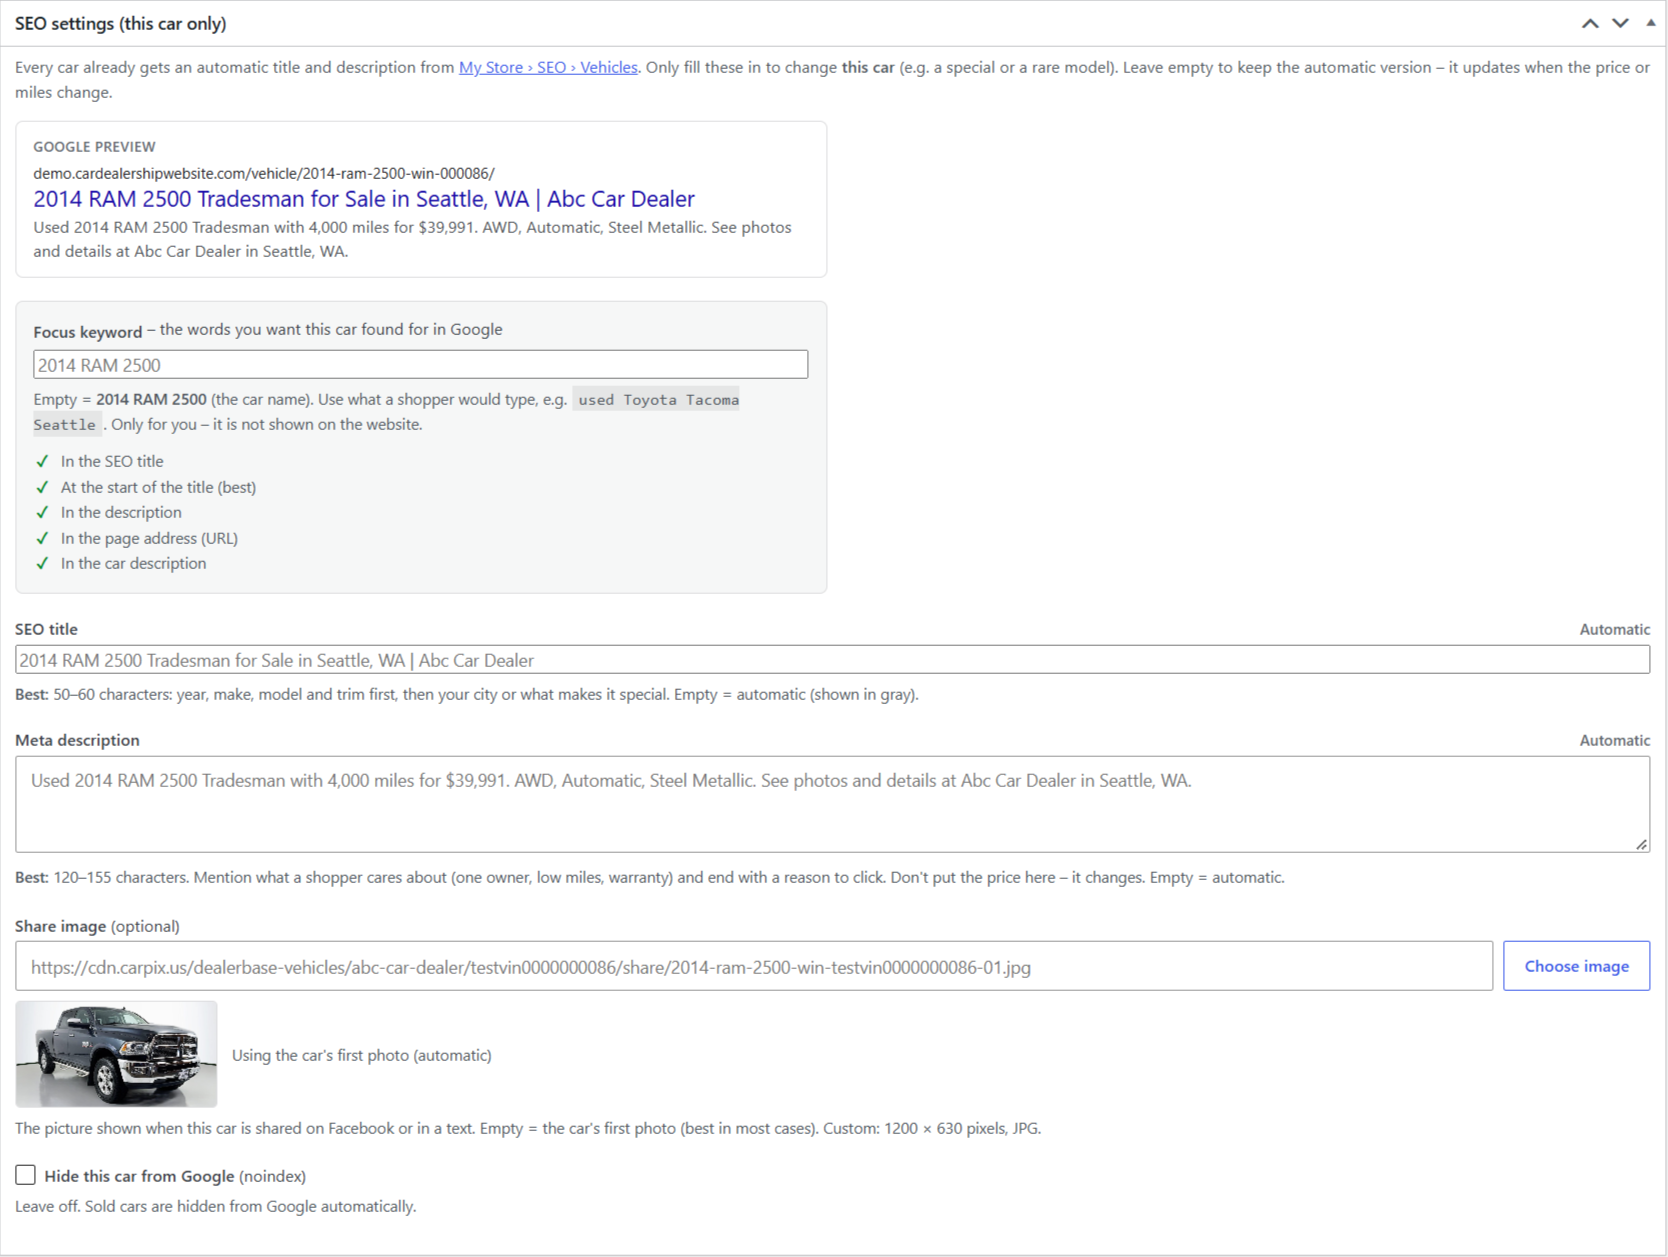
- Each car: an SEO box to override the title, description and share image (first photo by default), plus a focus keyword checklist.
- Each page and post: an SEO settings box with live counters and a Google preview. Filled in for you on save; your own text is never replaced.
- Deep filter pages are hidden from Google automatically. Using Yoast or Rank Math instead? Car Lots works with them without duplicate tags.
19. Redirects and "Pages not found"
Car Lots › Redirects sends an old address to a new page – handy after moving from an old website or renaming a page.
- Add the old and new address. 301 = moved for good (use this almost always), 302 = temporary. The Used column counts each redirect.
- Pages not found lists addresses shoppers tried that don't exist, how often, and where they came from. Make a redirect for the common ones.
- Sold cars are handled automatically: the old address goes to the same model in your inventory or a "This car has sold" page (Vehicle settings › Listings).
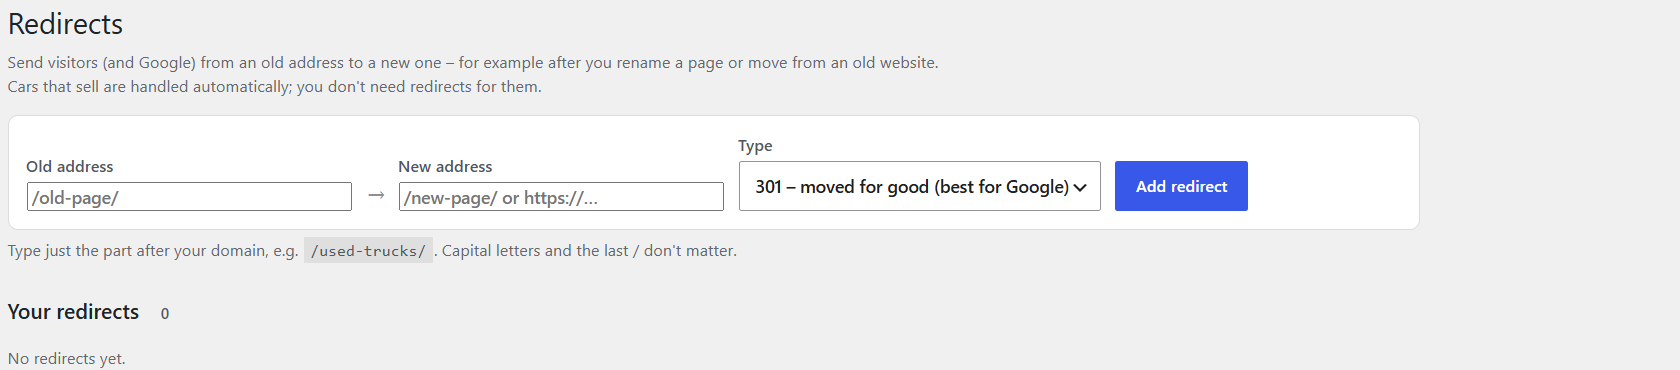

Step by step with screenshots: SEO Guide (redirects are steps 5–6)
20. Your own vehicle fields (custom fields)
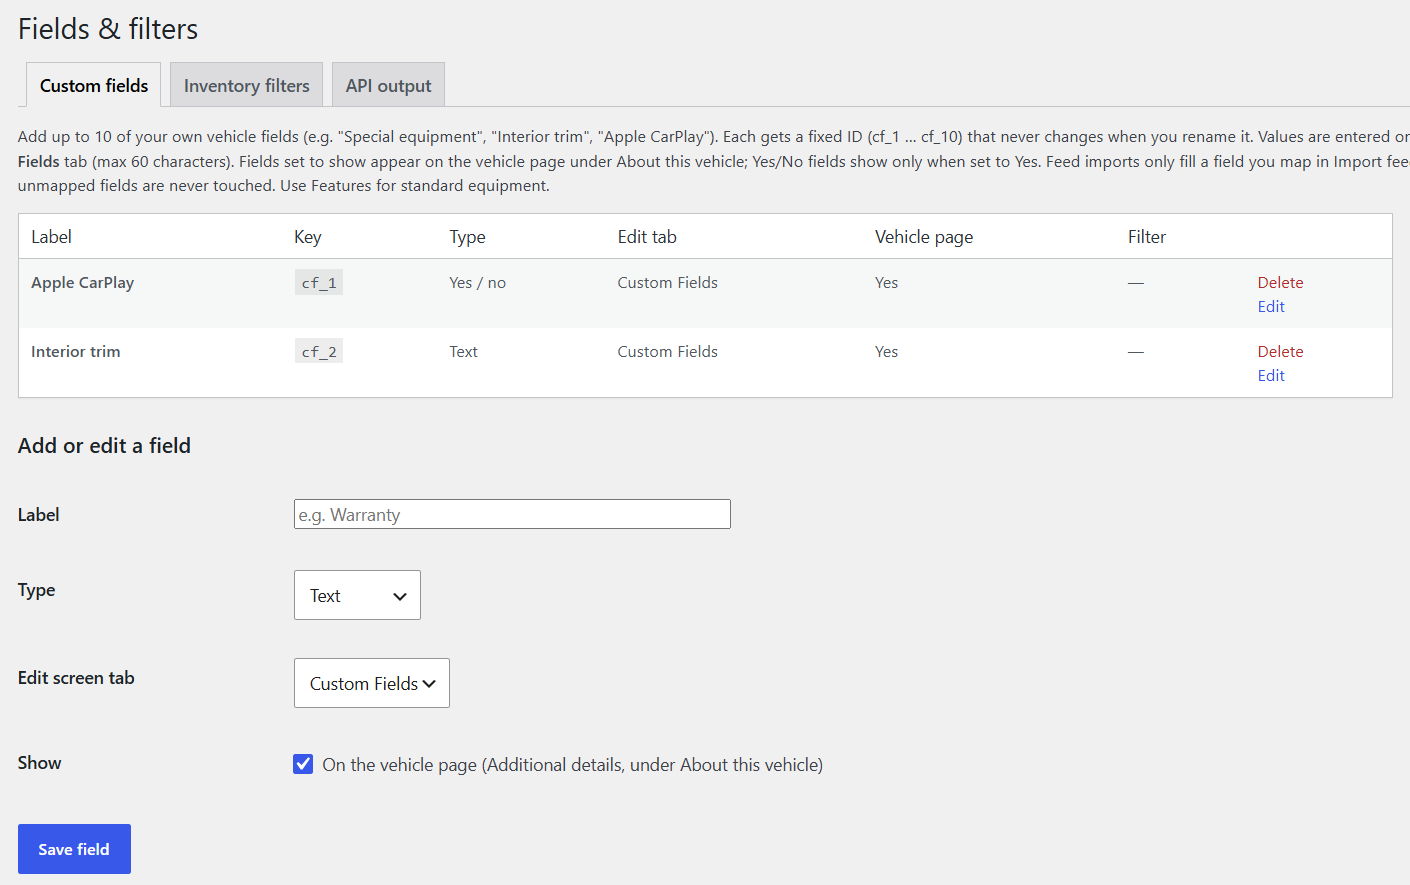
Need a detail Car Lots doesn't have, like "Apple CarPlay", "Lift kit" or "Service records"? Add up to 10 of your own fields in Vehicles › Fields & filters › Custom fields.
- Pick a type: Text, Number, Yes / no, Choice list, Link (URL) or Date.
- Pick which edit tab it shows on, and whether it shows on the vehicle page and as an inventory filter.
- Import it from your feed: your fields appear in Map fields (Import feeds, step 2) – drag the feed column onto them like any other field.
- Each field has a fixed ID (cf_1 … cf_10). Renaming a field never loses saved values or feed matches.
- The same screen also turns the built-in inventory filters on or off, renames them and sets their order (below).
Inventory filters: what shoppers can filter by
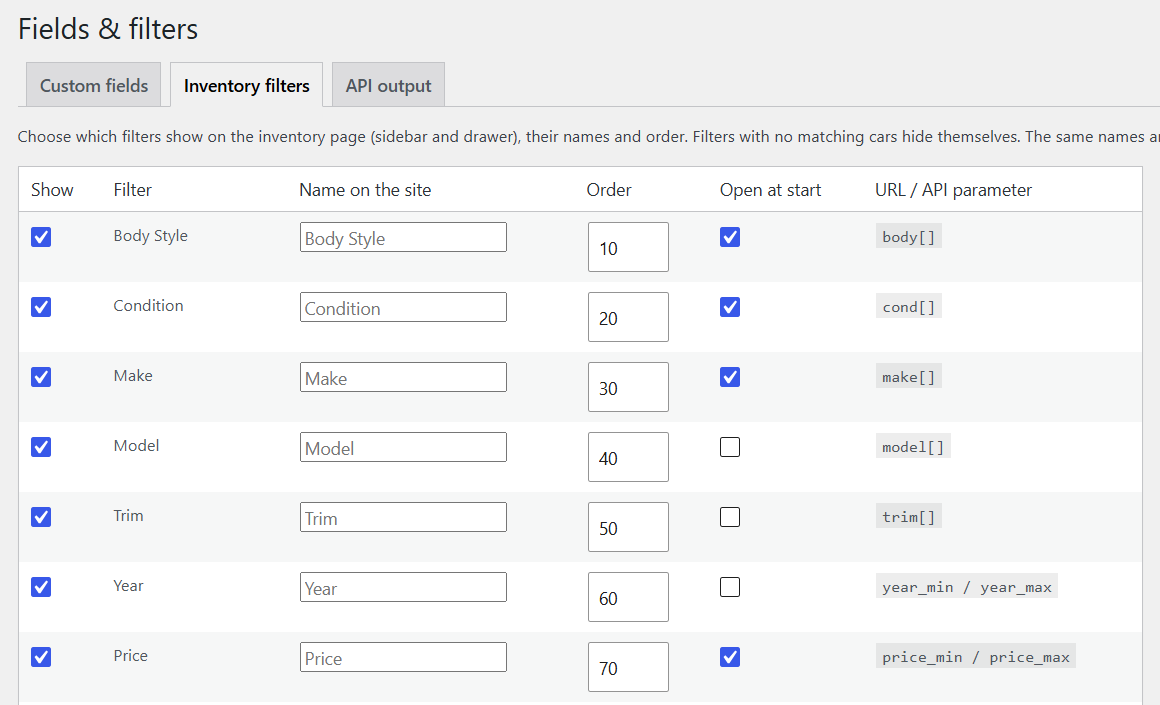
Vehicles › Fields & filters › Inventory filters sets the filters in the inventory sidebar (and the filter drawer on phones and tablets).
- Show: a filter only appears on your site when its Show box is ticked. Untick it to hide that filter.
- Name on the site: rename a filter, e.g. "Body Style" → "Type".
- Order: lower numbers show first (10, 20, 30…).
- Open at start: ticked filters show their choices open when the page loads. The others start closed until the shopper taps them.
- A filter with no matching cars hides by itself (e.g. Condition when all cars are Used).
- Click Save filters when done.
Make your own field a filter (or any other vehicle field, like Seating, Owners or Store): at the bottom of the same tab, under Add a filter from any vehicle field, pick the field, pick how it filters (e.g. Checkbox list) and click Add filter. Then check that its Show box is ticked and click Save filters. It now shows in the sidebar and in the site search list.

API output (for apps and developers)
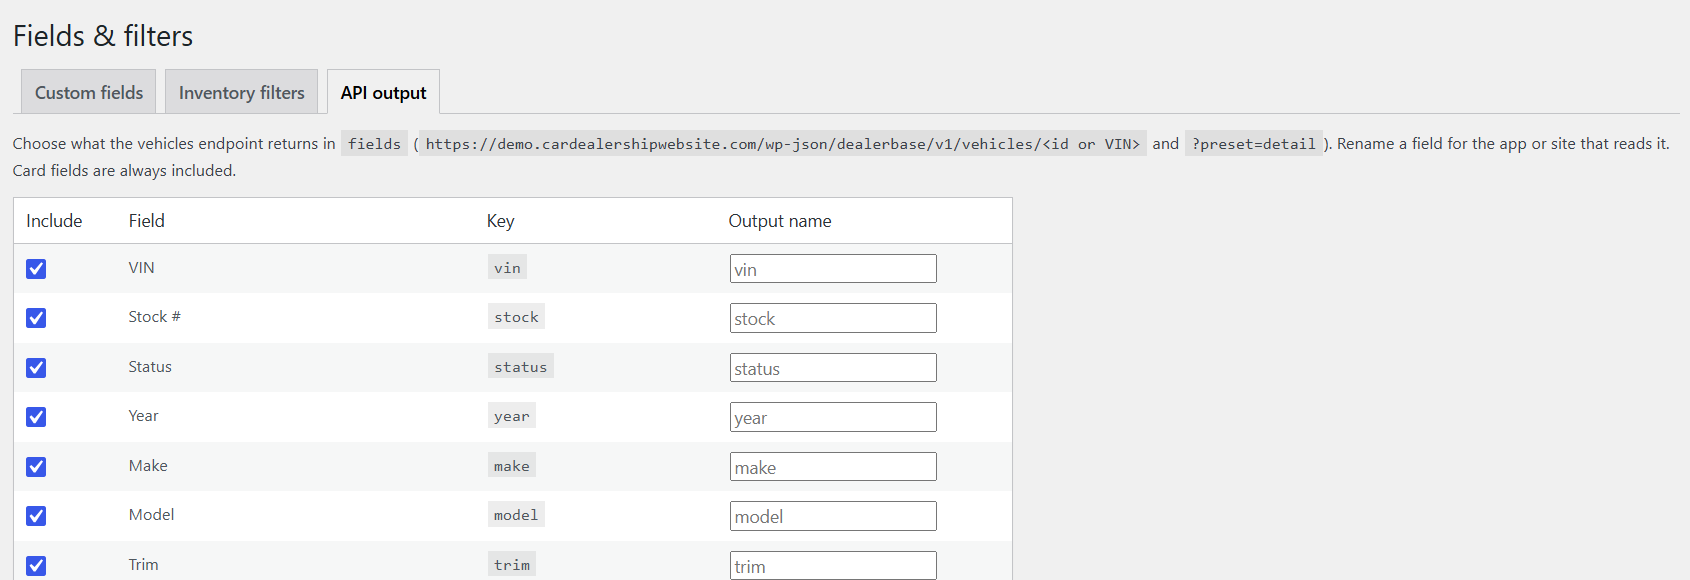
The API output tab picks which vehicle details are shared with other apps or websites that read your inventory, and what each one is called. Most dealers never need to change it. If a marketing company or app developer asks for your vehicle data, send them to this tab.
21. Vehicle settings: payments, listings and feed
Vehicles › Vehicle settings holds the rules for all your cars. Change them any time.
Payments
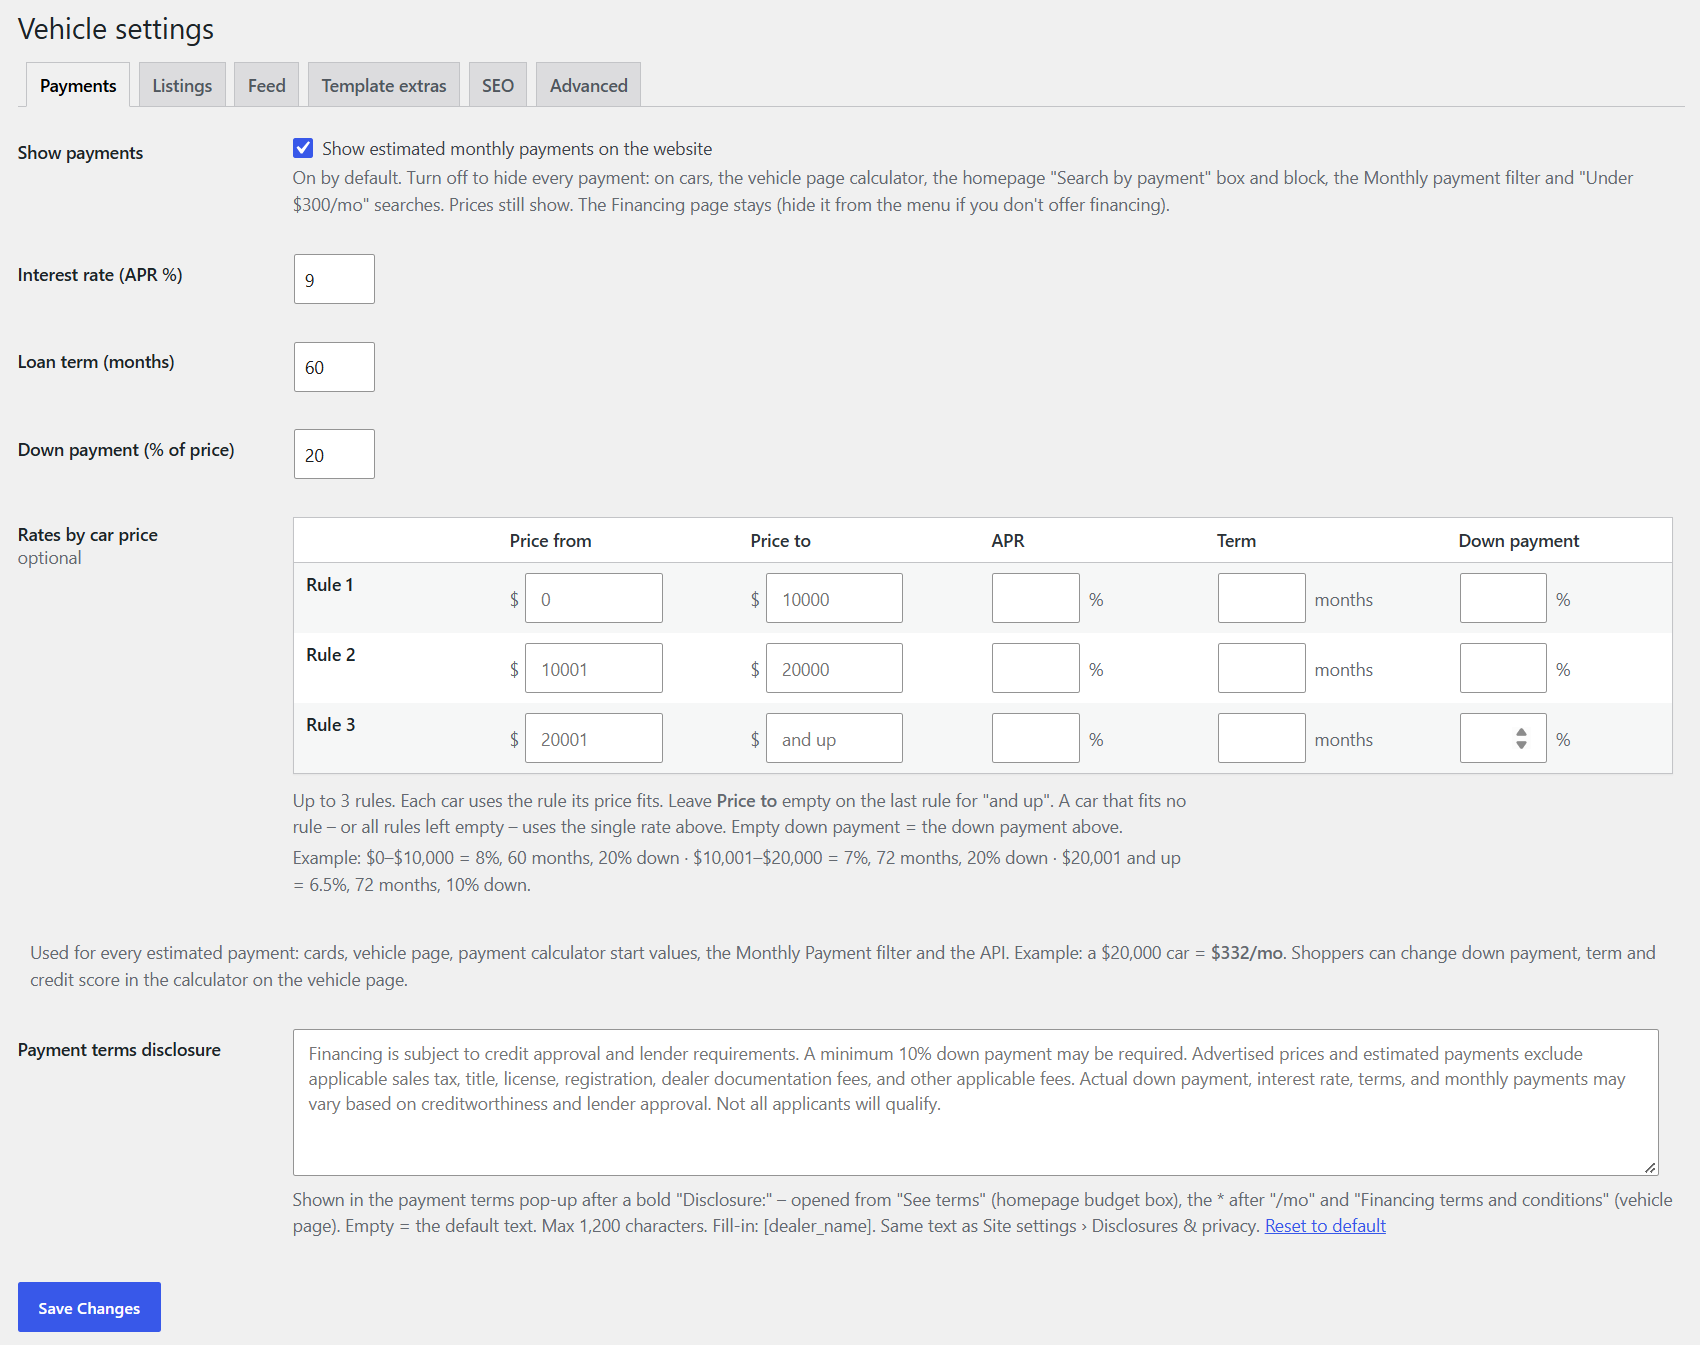
- Interest rate (APR %), Loan term (months) and Down payment (% of price): used for every estimated payment – cards, vehicle page, the payment calculator, the Monthly Payment filter and feeds.
- Show payments: on by default. Turn it off if you don't want to show monthly payments. That hides every payment on the site: on cars, the vehicle page calculator, the homepage "Search by payment" box and block, the Monthly payment filter and "Under $300/mo" searches. Prices still show.
- Rates by car price (optional): up to 3 rules, each with a price From and To, an APR, a term and a down payment. Example: $0 to $10,000 = 8% for 60 months, 20% down. $10,001 to $20,000 = 7% for 72 months, 20% down. $20,001 and up (leave To empty) = 6.5% for 72 months, 10% down. Each car uses the rule its price fits. Cars that fit no rule use the single rate above.
- Payment terms disclosure: the fine print shown with payments (e.g. "subject to credit approval…"). Have your lawyer check it.
- Disclosures & privacy in Site settings has the short Payment estimate note under cards, with fill-ins [months] [apr] [down].
Listings
- Photos needed to publish (e.g. 2): cars with fewer wait as drafts.
- Days a sold car stays online, then what its page does: send shoppers to the same model or show a "This car has sold" page. Delete sold cars after (days), 0 = never.
- Trims to ignore: junk trim words from your feed (e.g. "Base", "4dr Car", "N/A") are removed from car names and filters. Add your own, one per line.
- Default vehicle description (see section 7), badges, and photo rules (see section 12).
Feed
- Feed runs before "sold" (2) and Broken-feed protection (30%) – see section 8.
22. Legal pages
Your site comes with a Privacy Policy, Terms of Use and Terms and Conditions, linked in the footer. Your name, address and phone fill in automatically. Edit them in Pages like any website page.
23. Help and questions
I'm not getting lead emails.
Check the addresses in Forms & leads, look in your spam folder, and send a test lead.
My CRM isn't getting leads.
Make sure "Do you use a CRM?" is Yes, the form is set to go to your CRM, and the ADF email is exactly what your CRM rep gave you. Financing and Contact us leads never go to the CRM.
I can't change the price on a car.
It comes from your inventory feed. Change it in your inventory system and it updates on the next import.
A section disappeared from my page.
It may be hidden, or it has no info yet (for example, no reviews or no team). Turn it back on in the page editor or fill in the info in Site settings.
24. Coming later
- Scan VIN with your phone camera on the Add vehicle page
- More homepage and vehicle page styles
- A second follow-up email to shoppers a few days after they contact you (the instant "Thanks, we got your request" email already works)
Car Lots dealer guide · Screens and wording may change before release.